Welcome to this Beginner’s Guide to Azure Data Factory! In this series, I’m going to cover the fundamentals of Azure Data Factory in casual, bite-sized blog posts that you can read through at your own pace and reference later. You may not be new to ETL, data integration, Azure, or SQL, but we’re going to start completely from scratch when it comes to Azure Data Factory.
How do you get started building data pipelines? What if you need to transform or re-shape data? How do you schedule and monitor your data pipelines? Can you make your solution dynamic and reusable? Join me in this Beginner’s Guide to Azure Data Factory to learn all of these things - and maybe more. 🤓 Let’s go!
P.S. This series will always be a work-in-progress. Yes, always. Azure changes often, so I keep coming back to tweak, update, and improve content. I just might not be able to do it right away!
Hi! I’m Cathrine 👋🏻 I really like Azure Data Factory. It’s one of my favorite topics, I can talk about it for hours. But talking about it can only help so many people - the ones who happen to attend an event where I’m presenting a session. So I’ve decided to try something new… I’m going to write an introduction to Azure Data Factory! And not just one blog post. A whole bunch of them.
I’m going to take all the things I like to talk about and turn them into bite-sized blog posts that you can read through at your own pace and reference later. I’ve named this series Beginner’s Guide to Azure Data Factory. You may not be new to ETL, data integration, Azure, or SQL, but we’re going to start completely from scratch when it comes to Azure Data Factory.
In the introduction to Azure Data Factory, we learned a little bit about the history of Azure Data Factory and what you can use it for. In this post, we will be creating an Azure Data Factory and navigating to it.
Spoiler alert! Creating an Azure Data Factory is a fairly quick click-click-click process, and you’re done. But! Before you can do that, you need an Azure Subscription, and the right permissions on that subscription. Let’s get that sorted out first.
Azure Subscription and Permissions
If you don’t already have an Azure Subscription, you can create a free account on azure.microsoft.com/free. (Woohoo! Free! Yay!) Some of the Azure services will always be free, while some are free for the first 12 months. You get $200 worth of credits that last 30 days so you can test and learn the paid Azure services. One tip: Time your free account wisely ⏳
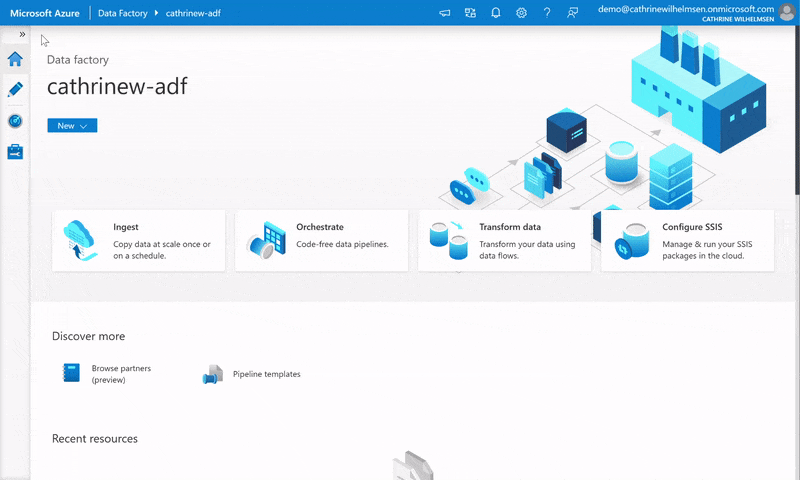
In the previous post, we started by creating an Azure Data Factory, then we navigated to it. In this post, we will navigate inside the Azure Data Factory. Let’s look at the Azure Data Factory user interface and the four Azure Data Factory pages.
Azure Data Factory Pages
On the left side of the screen, you will see the main navigation menu. Click on the arrows to expand and collapse the menu:
In the previous post, we looked at the Azure Data Factory user interface and the four main Azure Data Factory pages. In this post, we will go through the Author page in more detail and look at a few things on the Monitoring page. Let’s look at the different Azure Data Factory components!
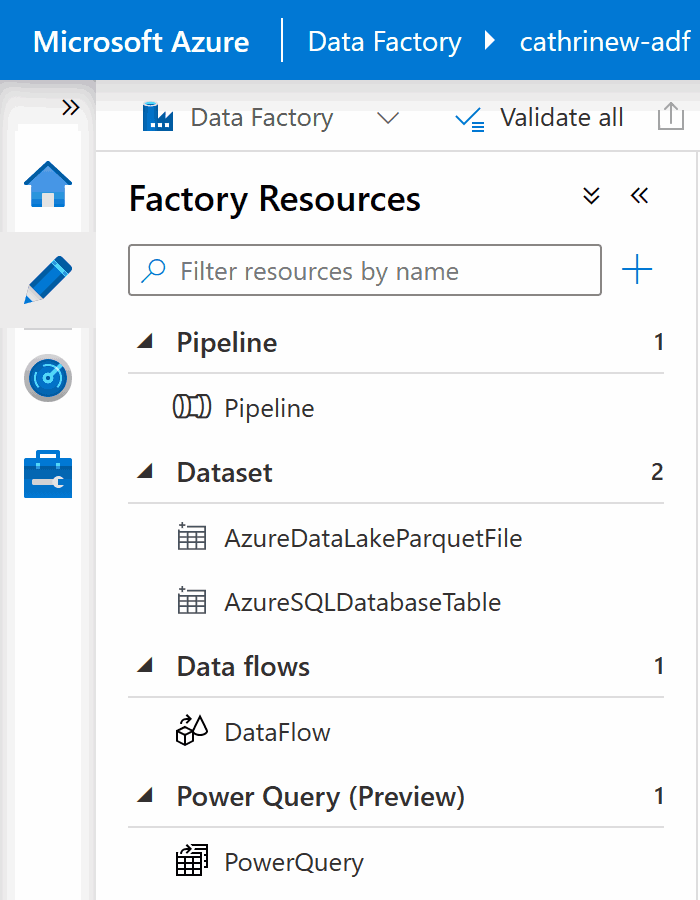
Azure Data Factory Components on the Author Page
On the left side of the Author page, you will see your factory resources. In this example, we have already created one pipeline, two datasets, one data flow, and one power query:
Let’s go through each of these Azure Data Factory components and explain what they are and what they do.
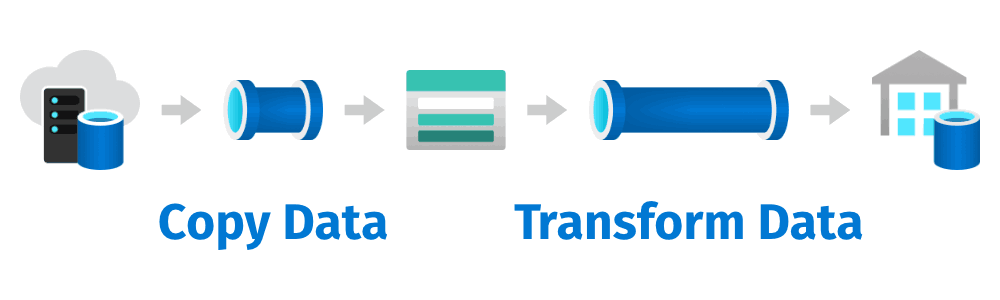
In the previous post, we looked at the different Azure Data Factory components. In this post, we’re going to tie everything together and start making things happen. Woohoo! First, we will get familiar with our demo datasets. Then, we will create our Azure Data Lake Storage Account that we will copy data into. Finally, we will start copying data using the Copy Data Tool.
Demo Datasets
First, let’s get familiar with the demo datasets we will be using. I don’t know about you, but I’m a teeny tiny bit tired of the AdventureWorks demos. (I don’t even own a bike…) WideWorldImporters is at least a little more interesting. (Yay, IT joke mugs and chocolate frogs!) But! Let’s use something that might be a little bit more fun to explore.
In the previous post, we used the Copy Data Tool to copy a file from our demo dataset to our data lake. The Copy Data Tool created all the factory resources for us: pipelines, activities, datasets, and linked services.
In this post, we will go through pipelines in more detail. How do we create and organize them? What are their main properties? Can we edit them without using the graphical user interface?
How do I create pipelines?
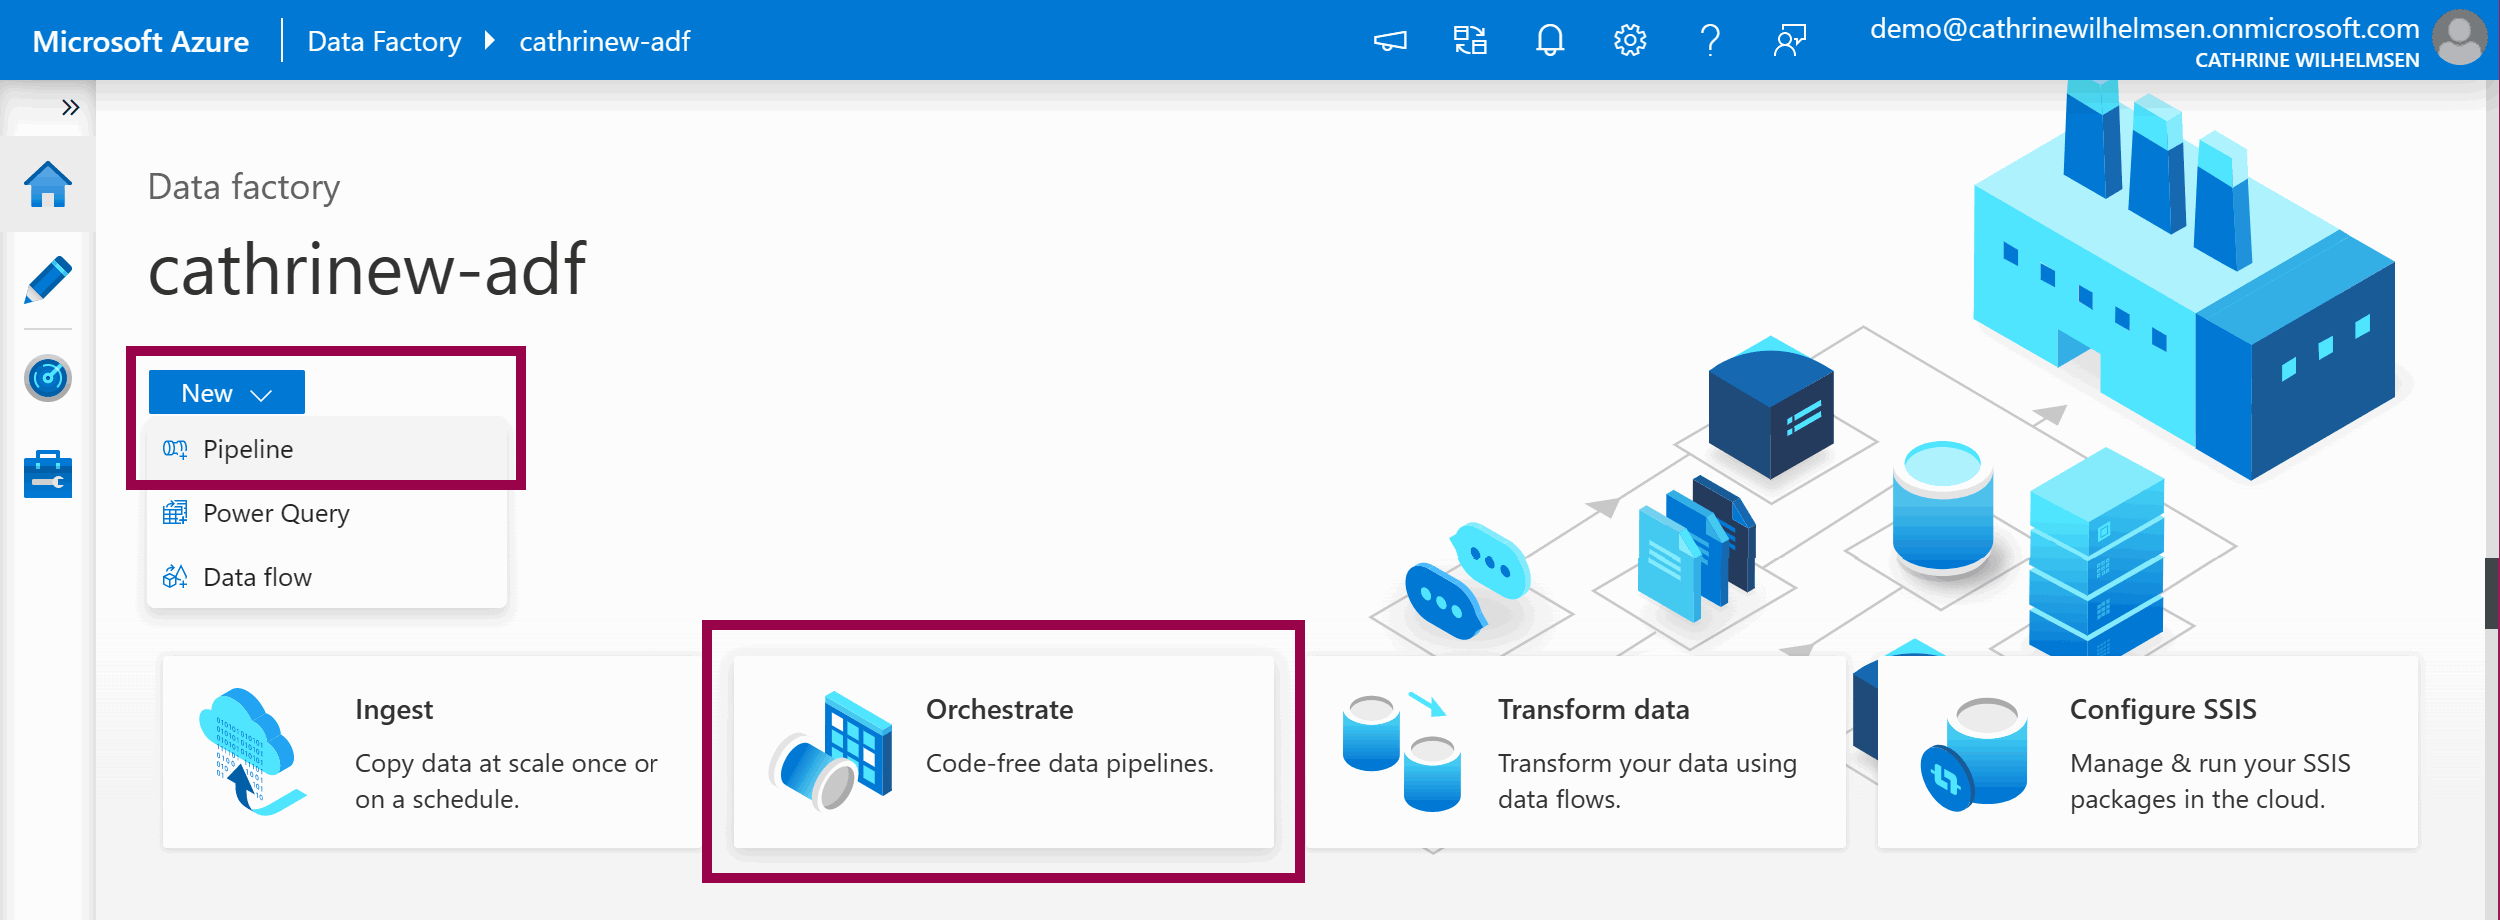
So far, we have created a pipeline by using the Copy Data Tool. There are several other ways to create a pipeline.
On the Home page, click on the New → Pipeline dropdown menu, or click on the Orchestrate shortcut tile:
In the previous post, we went through Azure Data Factory pipelines in more detail. In this post, we will dig into the copy data activity. How does it work? How do you configure the settings? And how can you optimize performance while keeping costs down?
Copy Data Activity
The copy data activity is the core (*) activity in Azure Data Factory.
(*Cathrine’s opinion 🤓)
You can copy data to and from more than 90 Software-as-a-Service (SaaS) applications (such as Dynamics 365 and Salesforce), on-premises data stores (such as SQL Server and Oracle), and cloud data stores (such as Azure SQL Database and Amazon S3). During copying, you can define and map columns implicitly or explicitly, convert file formats, and even zip and unzip files – all in one task.
In the previous post, we looked at the copy data activity and saw how the source and sink properties changed with the datasets used. In this post, we will take a closer look at some common datasets and their properties.
Let’s start with the source and sink datasets we created in the copy data wizard!
Dataset Names
First, a quick note. If you use the copy data tool, you can change the dataset names by clicking the edit button on the summary page…
In the previous post, we looked at datasets and their properties. In this post, we will look at linked services in more detail. How do you configure them? What are the authentication options for Azure services? And how do you securely store your credentials?
Let’s start by creating a linked service to an Azure SQL Database. Yep, that linked service you saw screenshots of in the previous post. Mhm, the one I sneakily created already so I could explain using datasets as a bridge to linked services. That one 😅
Pssst! Linked Services have been moved into the management page. I'm working on updating the descriptions and screenshots, thank you for your understanding and patience 😊
So far in this Azure Data Factory series, we have looked at copying data. We have created pipelines, copy data activities, datasets, and linked services. In this post, we will peek at the second part of the data integration story: using data flows for transforming data.
But first, I need to make a confession. And it’s slightly embarrassing…
I don’t use data flows enough to keep up with all the changes and new features 😳
Don’t get me wrong. I want to! I really, really, really want to. But since I don’t currently use data flows on a daily basis, I struggle to find time to sit down and dig into all the cool new things.
So! In this blog post, I will mostly scratch the surface of data flows, then refer to awesome people with excellent resources so you can learn all the details from them.
In the previous post, we peeked at the two different data flows in Azure Data Factory, then created a basic mapping data flow. In this post, we will look at orchestrating pipelines using branching, chaining, and the execute pipeline activity.
Let’s continue where we left off in the previous post. How do we wire up our solution and make it look something like this?
We need to make sure that we get the data before we can transform that data.
One way to build this solution is to create a single pipeline with a copy data activity followed by a data flow activity. But! Since we have already created two separate pipelines, and this post is about orchestrating pipelines, let’s go with the second option 😎
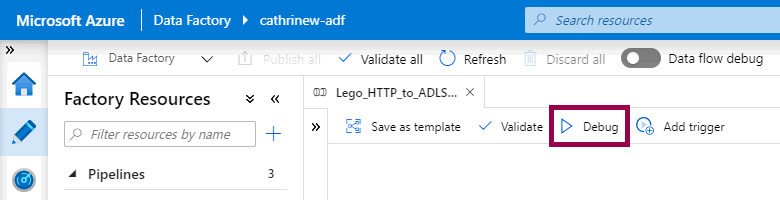
In the previous post, we looked at orchestrating pipelines using branching, chaining, and the execute pipeline activity. In this post, we will look at debugging pipelines. How do we test our solutions?
You debug a pipeline by clicking the debug button:
Tadaaa! Blog post done? 😂
I joke, I joke, I joke. Debugging pipelines is a one-click operation, but there are a few more things to be aware of. In the rest of this post, we will look at what happens when you debug a pipeline, how to see the debugging output, and how to set breakpoints.
Pssst! The debugging experience has had a huge makeover since I first wrote this post. I'm working on updating the descriptions and screenshots, thank you for your understanding and patience 😊
In the previous post, we looked at testing and debugging pipelines. But how do you schedule your pipelines to run automatically? In this post, we will look at the different types of triggers in Azure Data Factory.
Let’s start by looking at the user interface, and dig into the details of the different trigger types.
Pssst! Triggers have been moved into the management page. I'm working on updating the descriptions and screenshots, thank you for your understanding and patience 😊
In the previous post, we looked at the three different trigger types, as well as how to trigger pipelines on-demand. In this post, we will look at what happens after that. How does monitoring work in Azure Data Factory?
Now, if we want to look at monitoring, we probably need something to monitor first. I mean, I could show you a blank dashboard, but I kind of already did that, and that wasn’t really interesting at all 🤔 So! In the previous post, I created a schedule trigger that runs hourly, added it to my orchestration pipeline, and published it.
Let’s take a look at what has happened since then!
In the previous post, we looked at how monitoring and alerting works. But what if we want to customize the monitoring views even further? There are a few ways to do that in Azure Data Factory. In this post, we will add both annotations and custom properties.
But before we do that, let’s look at a few more ways to customize the monitoring views.
Customizing Monitoring Views
In the previous post, we mainly looked at how to configure the monitoring and alerting features. We saw that we could change filters and switch between list and Gantt views, but it’s possible to tweak the interface even more to our liking.
So far in this series, we have only worked with cloud data stores. But what if we need to work with on-premises data stores? After all, Azure Data Factory is a hybrid data integration service :) To do that, we need to create and configure a self-hosted integration runtime. But before we do that, let’s look at the different types of integration runtimes!
Pssst! Integration Runtimes have been moved into the management page. I'm working on updating the descriptions and screenshots, thank you for your understanding and patience 😊
In the previous post, we looked at the three different types of integration runtimes. In this post, we will first create a self-hosted integration runtime. Then, we will create a new linked service and dataset using the self-hosted integration runtime. Finally, we will look at some common techniques and design patterns for copying data from and into an on-premises SQL Server.
And when I say “on-premises”, I really mean “in a private network”. It can either be a SQL Server on-premises on a physical server, or “on-premises” in a virtual machine.
Two posts ago, we looked at the three types of integration runtimes and created an Azure integration runtime. In the previous post, we created a self-hosted integration runtime for copying SQL Server data. In this post, we will complete the integration runtime part of the series. We will look at what SSIS Lift and Shift is, how to create an Azure-SSIS integration runtime, and how you can start executing SSIS packages in Azure Data Factory.
(And if you don’t work with SSIS, today is an excellent day to take a break from this series. Go do something fun! Like eat some ice cream. I’m totally going to eat ice cream after publishing this post 🍦)
Pssst! Integration Runtimes have been moved into the management page. I'm working on updating the descriptions and screenshots, thank you for your understanding and patience 😊
Raise your hand if you have wondered why you can only publish and not save anything in Azure Data Factory 🙋🏼♀️ Wouldn’t it be nice if you could save work in progress? Well, you can. You just need to set up source control first! In this post, we will look at why you should use source control, how to set it up, and how to use it inside Azure Data Factory.
And yeah, I usually recommend that you set up source control early in your project, and not on day 19… However, it does require some external configuration, and in this series I wanted to get through the Azure Data Factory basics first. But by now, you should know enough to decide whether or not to commit to Azure Data Factory as your data integration tool of choice.
Get it? Commit to Azure Data Factory? Source Control? Commit? 🤓
Ok, that was terrible, I know. But hey, I’ve been writing these posts for 18 days straight now, let me have a few minutes of fun with Wil Wheaton 😂
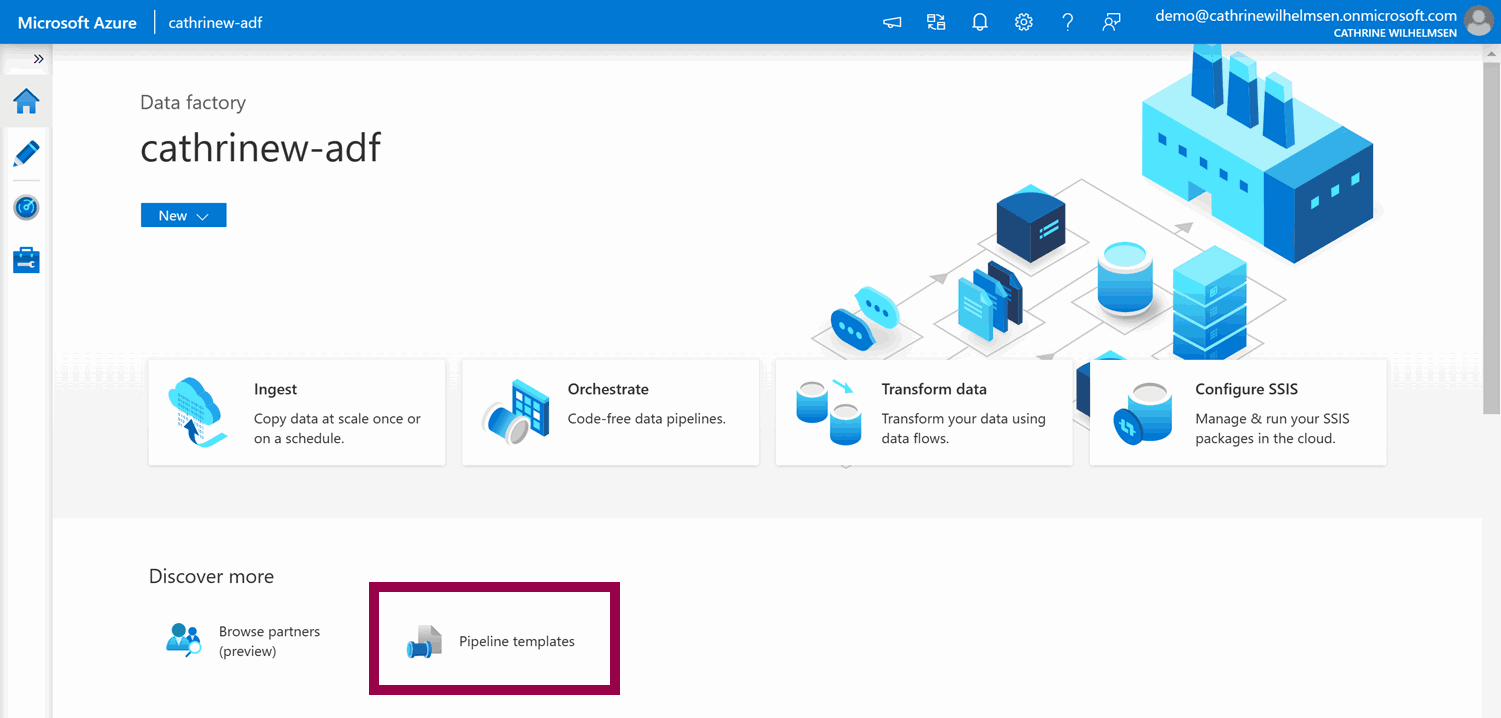
In the previous post, we looked at setting up source control. Once we did that, a new menu popped up under factory resources: templates! In this post, we will take a closer look at this feature. What is the template gallery? How can you create pipelines from templates? And how can you create your own templates?
Let’s hop straight into Azure Data Factory!
Using Templates from the Template Gallery
From the Home page, you can create pipelines from templates:
In the last mini-series inside the series (🙃), we will go through how to build dynamic pipelines in Azure Data Factory. In this post, we will look at parameters, expressions, and functions. Later, we will look at variables, loops, and lookups. Fun!
But first, let’s take a step back and discuss why we want to build dynamic pipelines at all.
Pssst! There are now also Global Parameters, woohoo! They didn't exist when I first wrote this blog post. I'm working on updating the descriptions and screenshots, thank you for your understanding and patience 😊
In the previous post, we talked about why you would want to build a dynamic solution, then looked at how to use parameters. In this post, we will look at variables, how they are different from parameters, and how to use the set variable and append variable activities.
Variables
Parameters are external values passed into pipelines. They can’t be changed inside a pipeline. Variables, on the other hand, are internal values that live inside a pipeline. They can be changed inside that pipeline.
Parameters and variables can be completely separate, or they can work together. For example, you can pass a parameter into a pipeline, and then use that parameter value in a set variable or append variable activity.
In the previous post, we looked at how to use variables in pipelines. We took a sneak peek at working with an array, but we didn’t actually do anything with it. But now, we will! In this post, we will look at how to use arrays to control foreach loops.
ForEach Loops
You can use foreach loops to execute the same set of activities or pipelines multiple times, with different values each time. A foreach loop iterates over a collection. That collection can be either an array or a more complex object. Inside the loop, you can reference the current value using @item().
Let’s take a look at how this works in Azure Data Factory!
In the previous post, we looked at foreach loops and how to control them using arrays. But you can also control them using more complex objects! In this post, we will look at lookups. How do they work? What can you use them for? And how do you use the output in later activities, like controlling foreach loops?
Lookups
Lookups are similar to copy data activities, except that you only get data from lookups. They have a source dataset, but they do not have a sink dataset. (So, like… half a copy data activity? 😄) Instead of copying data into a destination, you use lookups to get configuration values that you use in later activities.
And how you use the configuration values in later activities depends on whether you choose to get the first row only or all rows.
But before we dig into that, let’s create the configuration datasets!
Congratulations! You’ve made it through my entire Beginner’s Guide to Azure Data Factory 🤓 We’ve gone through the fundamentals in the first 24 posts, and now we just have one more thing to talk about: Pricing.
And today, I’m actually going to talk! You see, in January 2022, I presented a 10-minute session at DataMinutes about understanding pipeline pricing in Azure Data Factory and Azure Synapse Analytics. And since it was recorded and the recording is available for free for everyone… Well, let’s just say that after 24 posts, I think we could both appreciate a short break from reading and writing 😅
For the past 25 days, I have written one blog post per day about Azure Data Factory. My goal was to start completely from scratch and cover the fundamentals in casual, bite-sized blog posts. This became the Beginner’s Guide to Azure Data Factory. Today, I will share a bunch of resources to help you continue your own learning journey.
I’ve already seen from your questions and comments that you are ready to jump way ahead and dive into way more advanced topics than I ever intended this series to cover 😉 And as much as I love Azure Data Factory, I can’t cover everything. So a little further down, I will share where and how and from who you can continue learning about Azure Data Factory.