So far in this series, we have only worked with cloud data stores. But what if we need to work with on-premises data stores? After all, Azure Data Factory is a hybrid data integration service :) To do that, we need to create and configure a self-hosted integration runtime. But before we do that, let’s look at the different types of integration runtimes!
Pssst! Integration Runtimes have been moved into the management page. I'm working on updating the descriptions and screenshots, thank you for your understanding and patience 😊
In the previous post, we looked at how monitoring and alerting works. But what if we want to customize the monitoring views even further? There are a few ways to do that in Azure Data Factory. In this post, we will add both annotations and custom properties.
But before we do that, let’s look at a few more ways to customize the monitoring views.
Customizing Monitoring Views
In the previous post, we mainly looked at how to configure the monitoring and alerting features. We saw that we could change filters and switch between list and Gantt views, but it’s possible to tweak the interface even more to our liking.
In the previous post, we looked at the three different trigger types, as well as how to trigger pipelines on-demand. In this post, we will look at what happens after that. How does monitoring work in Azure Data Factory?
Now, if we want to look at monitoring, we probably need something to monitor first. I mean, I could show you a blank dashboard, but I kind of already did that, and that wasn’t really interesting at all 🤔 So! In the previous post, I created a schedule trigger that runs hourly, added it to my orchestration pipeline, and published it.
Let’s take a look at what has happened since then!
In the previous post, we looked at testing and debugging pipelines. But how do you schedule your pipelines to run automatically? In this post, we will look at the different types of triggers in Azure Data Factory.
Let’s start by looking at the user interface, and dig into the details of the different trigger types.
Pssst! Triggers have been moved into the management page. I'm working on updating the descriptions and screenshots, thank you for your understanding and patience 😊
In the previous post, we looked at orchestrating pipelines using branching, chaining, and the execute pipeline activity. In this post, we will look at debugging pipelines. How do we test our solutions?
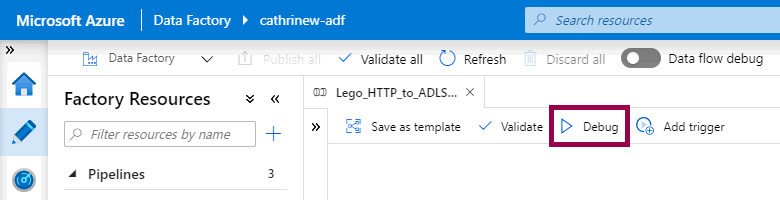
You debug a pipeline by clicking the debug button:
Tadaaa! Blog post done? 😂
I joke, I joke, I joke. Debugging pipelines is a one-click operation, but there are a few more things to be aware of. In the rest of this post, we will look at what happens when you debug a pipeline, how to see the debugging output, and how to set breakpoints.
Pssst! The debugging experience has had a huge makeover since I first wrote this post. I'm working on updating the descriptions and screenshots, thank you for your understanding and patience 😊