Lookups in Azure Data Factory

In the previous post, we looked at foreach loops and how to control them using arrays. But you can also control them using more complex objects! In this post, we will look at lookups. How do they work? What can you use them for? And how do you use the output in later activities, like controlling foreach loops?
Lookups

Lookups are similar to copy data activities, except that you only get data from lookups. They have a source dataset, but they do not have a sink dataset. (So, like… half a copy data activity? 😄) Instead of copying data into a destination, you use lookups to get configuration values that you use in later activities.
And how you use the configuration values in later activities depends on whether you choose to get the first row only or all rows.
But before we dig into that, let’s create the configuration datasets!
Creating Datasets for Lookups
In this example, I will create two different configuration datasets. The only reason I’m creating two datasets is to show a slight difference in how they’re used in the pipeline 😊
The first is a configuration file in Azure Data Lake Storage. The other is a configuration table in an Azure SQL Database. They both contain the same information:
| SourceSystem | SourceFileName | SourceFileExtension | IsActive |
|---|---|---|---|
| Lego | colors | csv | true |
| Lego | inventories | csv | true |
| Lego | inventory_parts | csv | true |
| Lego | inventory_sets | csv | false |
| Lego | part_categories | csv | true |
| Lego | part_relationships | csv | false |
| Lego | parts | csv | true |
| Lego | sets | csv | true |
| Lego | themes | csv | true |
Does it look familiar? We previously set these values using variables, but now we’re moving the logic out of the pipeline. This allows us to control what happens inside the pipeline without having to change the pipeline itself.
Example Configuration File
First, let’s look at how to lookup configuration values from a file. I’ve created a LegoConfigurationFile.csv that looks like this:
SourceSystem,SourceFileName,SourceFileExtension,IsActive
Lego,colors,csv,1
Lego,inventories,csv,1
Lego,inventory_parts,csv,1
Lego,inventory_sets,csv,0
Lego,part_categories,csv,1
Lego,part_relationships,csv,0
Lego,parts,csv,1
Lego,sets,csv,1
Lego,themes,csv,1
I’ve also created a new dataset for the file.
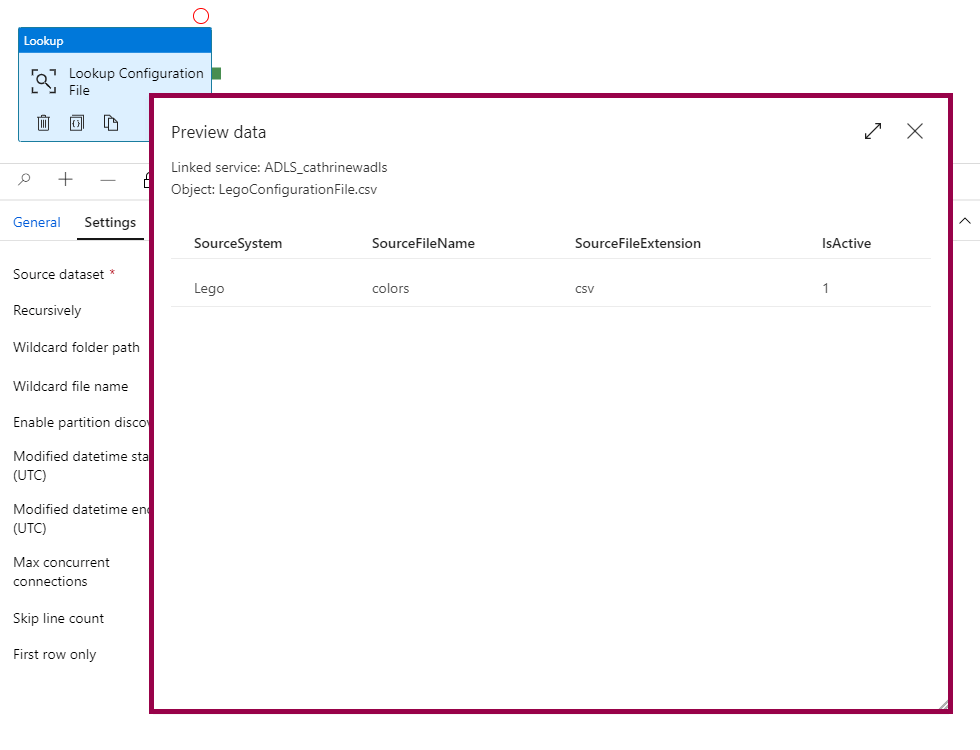
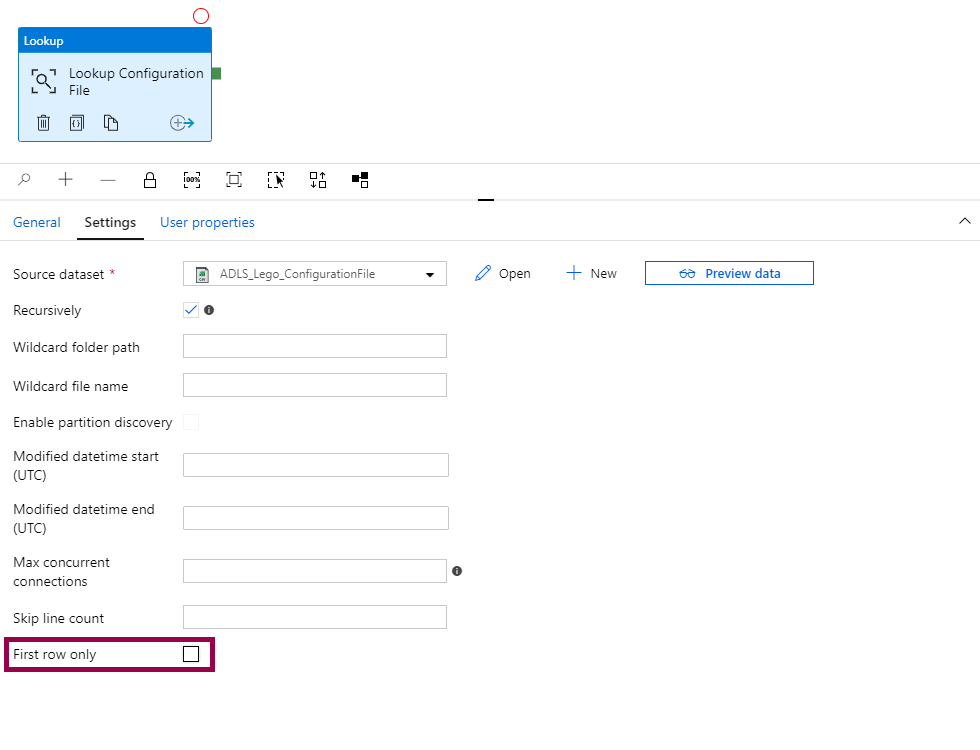
When we add a lookup activity and choose the new file dataset, we can choose to get the first row only:

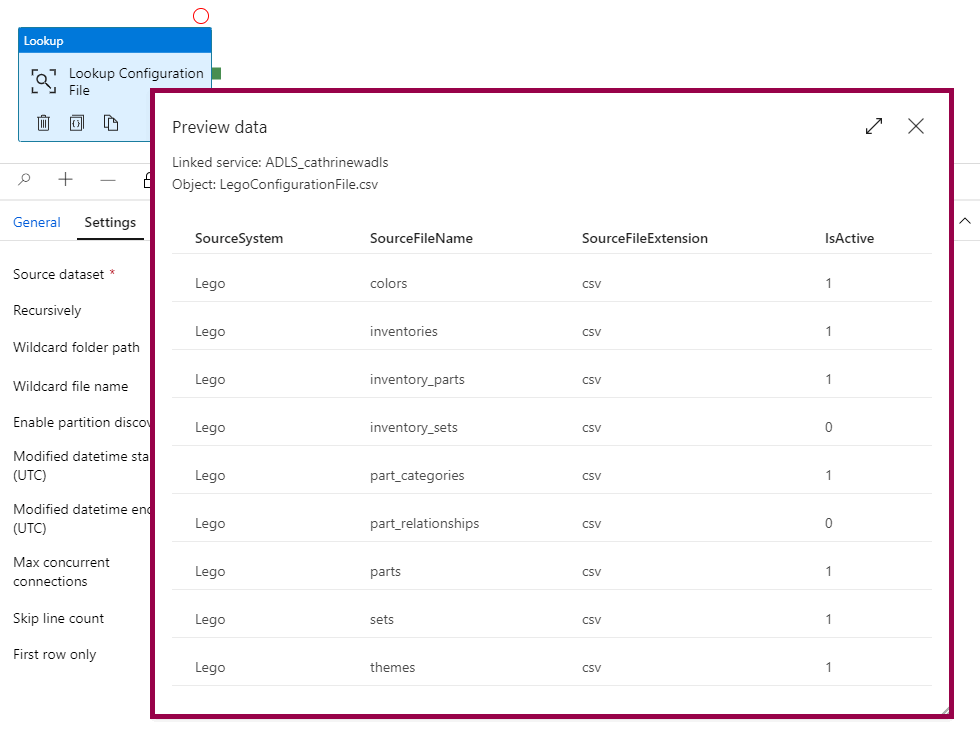
Or all rows:
But how do we filter just the active rows? To do that, we need to add an additional filter activity. We’ll get back to that a little further down.
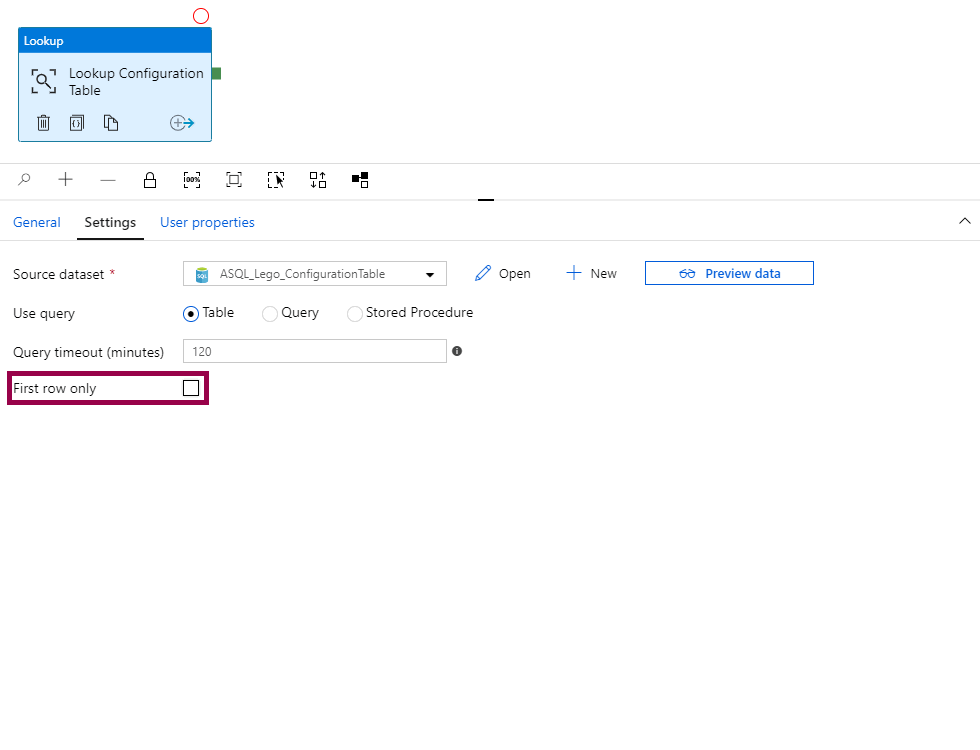
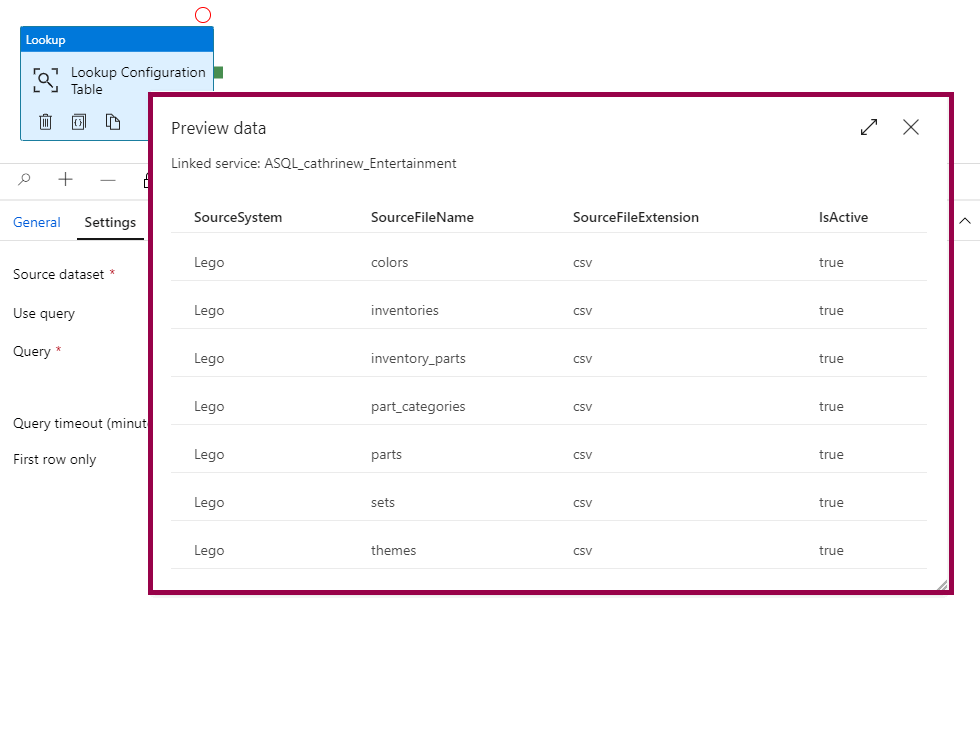
Example Configuration Table
Next, let’s look at how to lookup configuration values from a table. I’ve created an etl.ConfigurationTable table using this script:
/* --------------------------------------------------
     Create Schema
-------------------------------------------------- */
IF NOT EXISTS (SELECT * FROM sys.schemas WHERE name = N'etl')
    EXEC sys.sp_executesql N'CREATE SCHEMA etl';
GO

/* --------------------------------------------------
    Create and Insert Into Configuration Table
-------------------------------------------------- */
DROP TABLE IF EXISTS etl.ConfigurationTable;
GO
CREATE TABLE etl.ConfigurationTable (
    SourceSystem VARCHAR(100) NULL
   ,SourceFileName VARCHAR(100) NULL
   ,SourceFileExtension VARCHAR(10) NULL
   ,IsActive BIT NULL,
);
GO

INSERT INTO etl.ConfigurationTable (
    SourceSystem, SourceFileName, SourceFileExtension, IsActive
)
VALUES
    ('Lego', 'colors', 'csv', 1)
   ,('Lego', 'inventories', 'csv', 1)
   ,('Lego', 'inventory_parts', 'csv', 1)
   ,('Lego', 'inventory_sets', 'csv', 0)
   ,('Lego', 'part_categories', 'csv', 1)
   ,('Lego', 'part_relationships', 'csv', 0)
   ,('Lego', 'parts', 'csv', 1)
   ,('Lego', 'sets', 'csv', 1)
   ,('Lego', 'themes', 'csv', 1);
GO
I’ve also created a new dataset for the table.
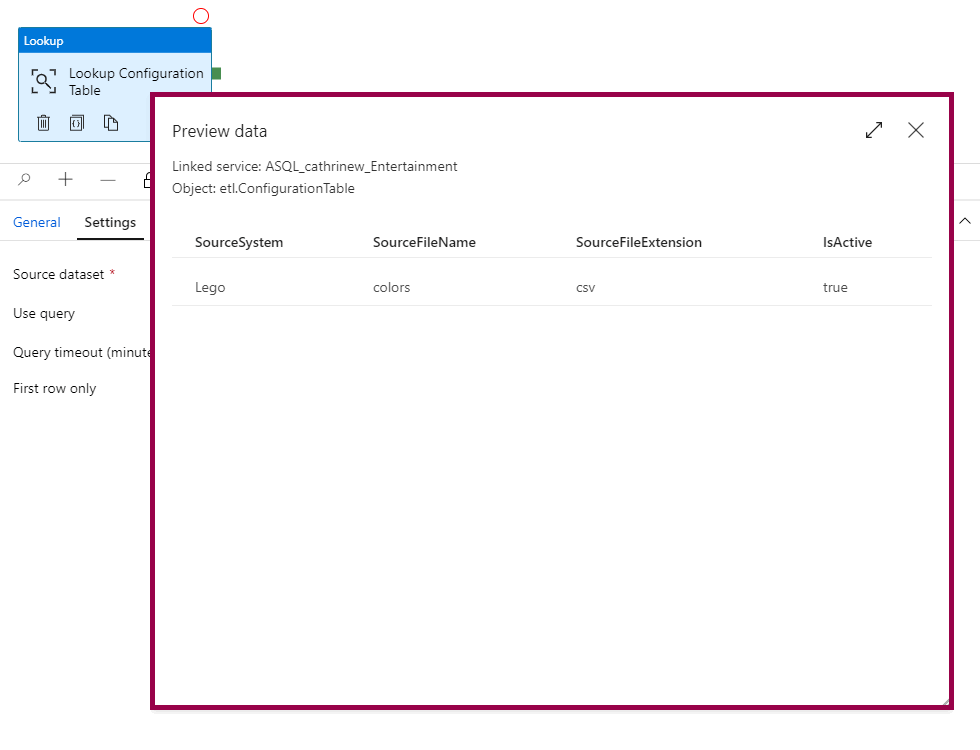
When we add a lookup activity and choose the new dataset, we can choose to get the first row only:

Or all rows:
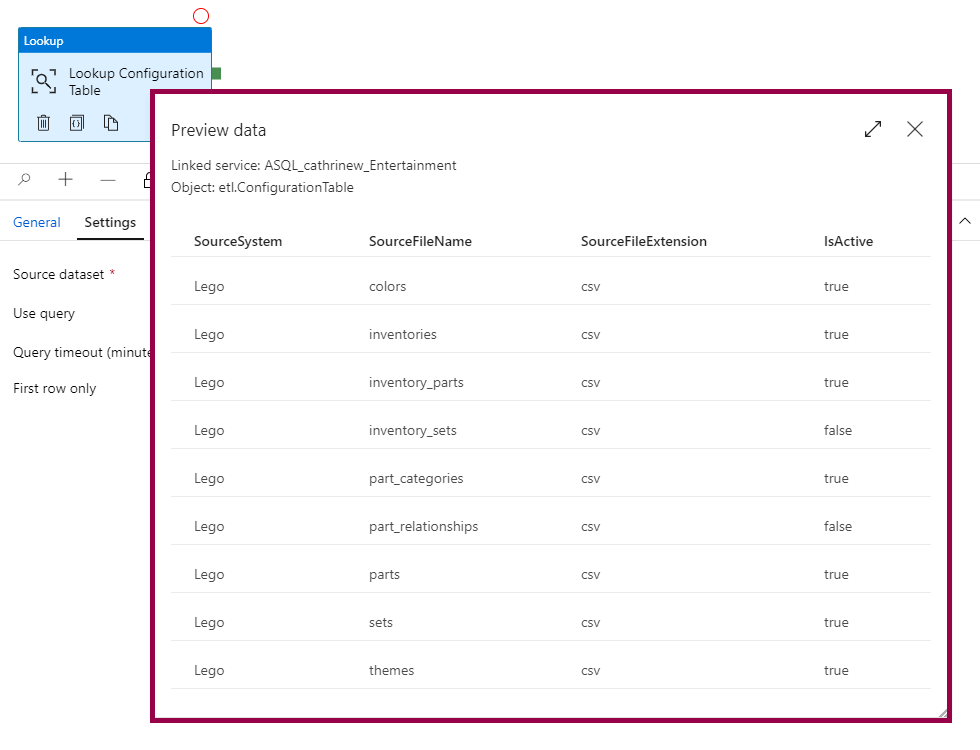
But in this case, we can also filter just the active rows without an additional filter activity. We can override the dataset with a custom query that filters rows:

Using Datasets from Lookups
Now that we have our lookup datasets configured, let’s see how we can use them in later activities!
And this is… not very intuitive 😅
Like I mentioned at the start of this post, how you use the configuration values in later activities depends on whether you choose to get the first row only or all rows. The reason for that is because the output looks different for each of these.
You can see the difference when you debug the lookup activity. Click the output button:
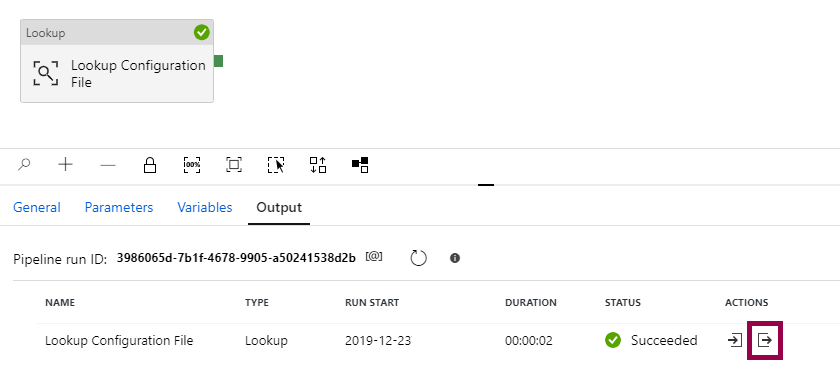
If you have selected first row only, the output will look something like this:
If you have selected all rows, the output will look something like this:
The JSON output is different. And this is the key to understanding lookups. You need to understand the JSON syntax, because that’s the output you use in later activities.
Let’s look at a few examples.
First Row Only
Say that we want to execute a single pipeline from a configuration table.
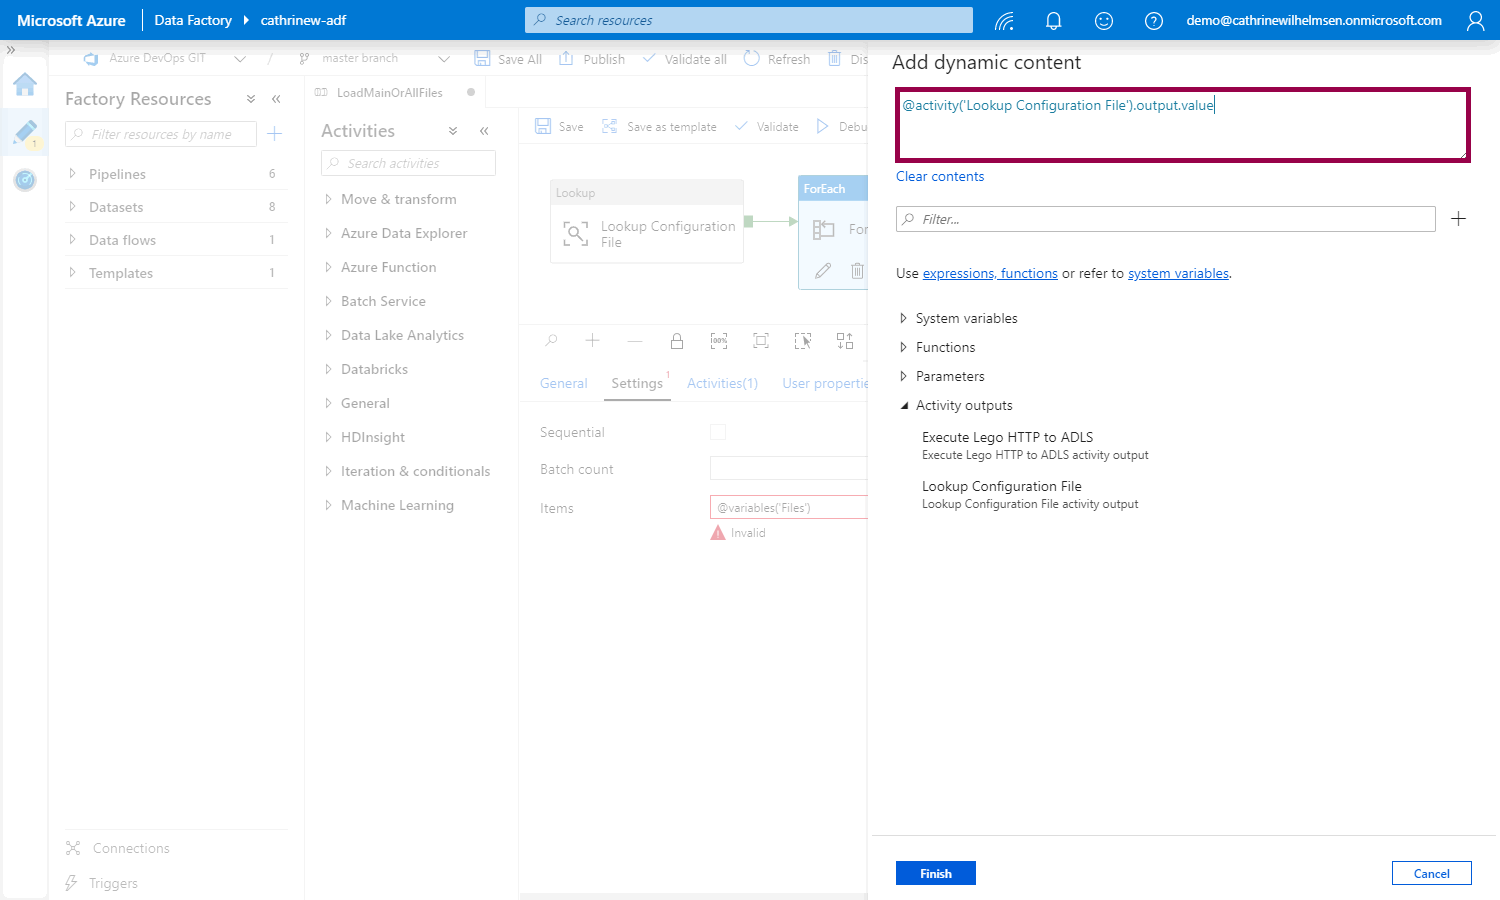
First, we use the lookup activity to get the first row only. Then, we add an execute pipeline activity. Now we want to pass the file name from the lookup activity to the execute pipeline parameter. Click add dynamic content:
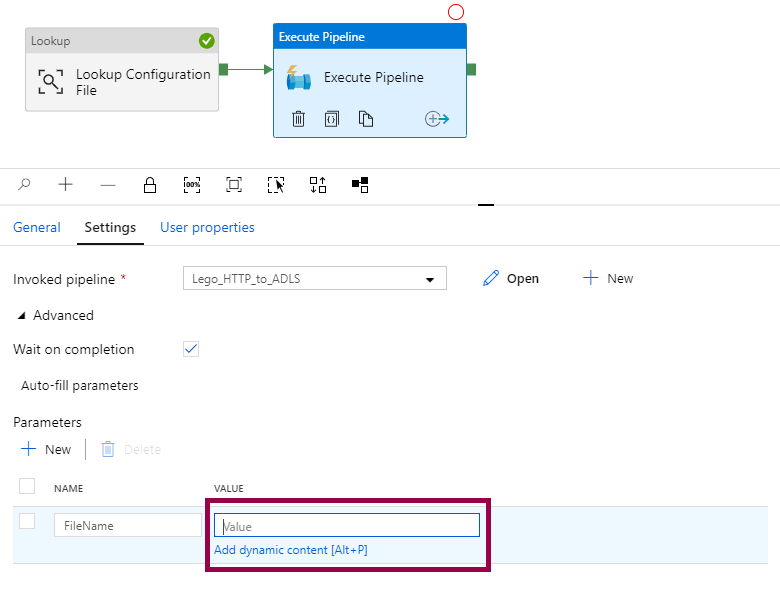
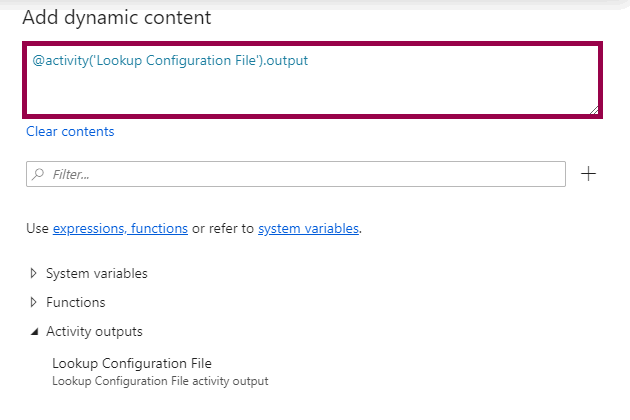
We now see an additional category called activity outputs, yay! Click on lookup configuration file:
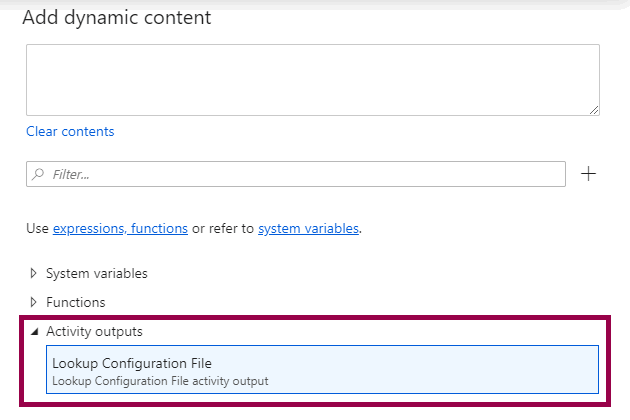
This adds @activity(‘Lookup Configuration File’).output to the dynamic content:
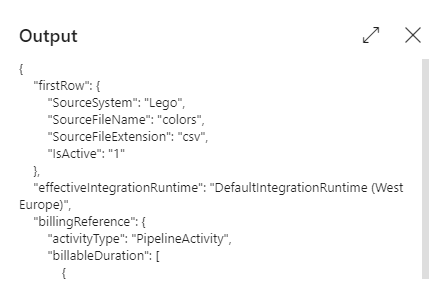
So far, so good! Except! Except that you probably don’t want to pass the entire output of the lookup activity as the file name parameter? 🤔 Remember the output screenshot a little further up? The JSON output looks like this:
{
    "firstRow": {
        "SourceSystem": "Lego",
        "SourceFileName": "colors",
        "SourceFileExtension": "csv",
        "IsActive": "1"
    }
}
…and that’s what you will pass in as the file name parameter if you use the default value @activity(‘Lookup Configuration File’).output. That’s… not going to work very well 😄
And this is exactly the part that I think is not very intuitive about lookups. Because there is nothing in the user interface that calls this out. There is nothing in the user interface that shows you that you are working with the first row only, or all rows, or which columns you can select. You need to know these things, and you need to understand the JSON syntax.
What you want to use is @activity(‘Lookup Configuration File’).output.firstRow.SourceFileName:
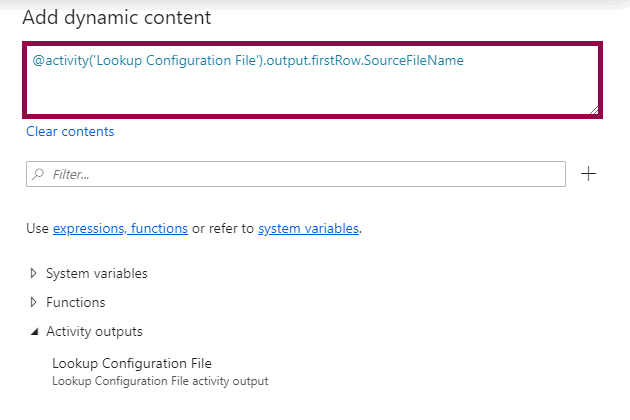
From the activity called Lookup Configuration File, you get the output. From the output, you go to the firstRow. Then, from FirstRow, you get the value of the column named SourceFileName:
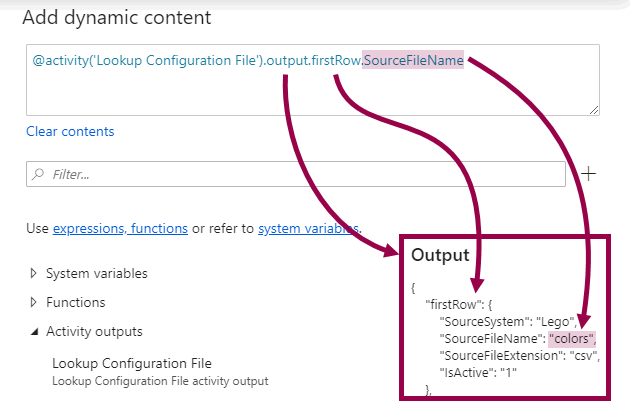
This will pass the value “colors” from the configuration file to the execute pipeline, which is what we want.
…yeah. I know. Not intuitive at all, but it makes sense once you figure everything out 😂
All Rows
Now, let’s go back to our example from the previous post about foreach loops. What we want to do is replace the variable activities…
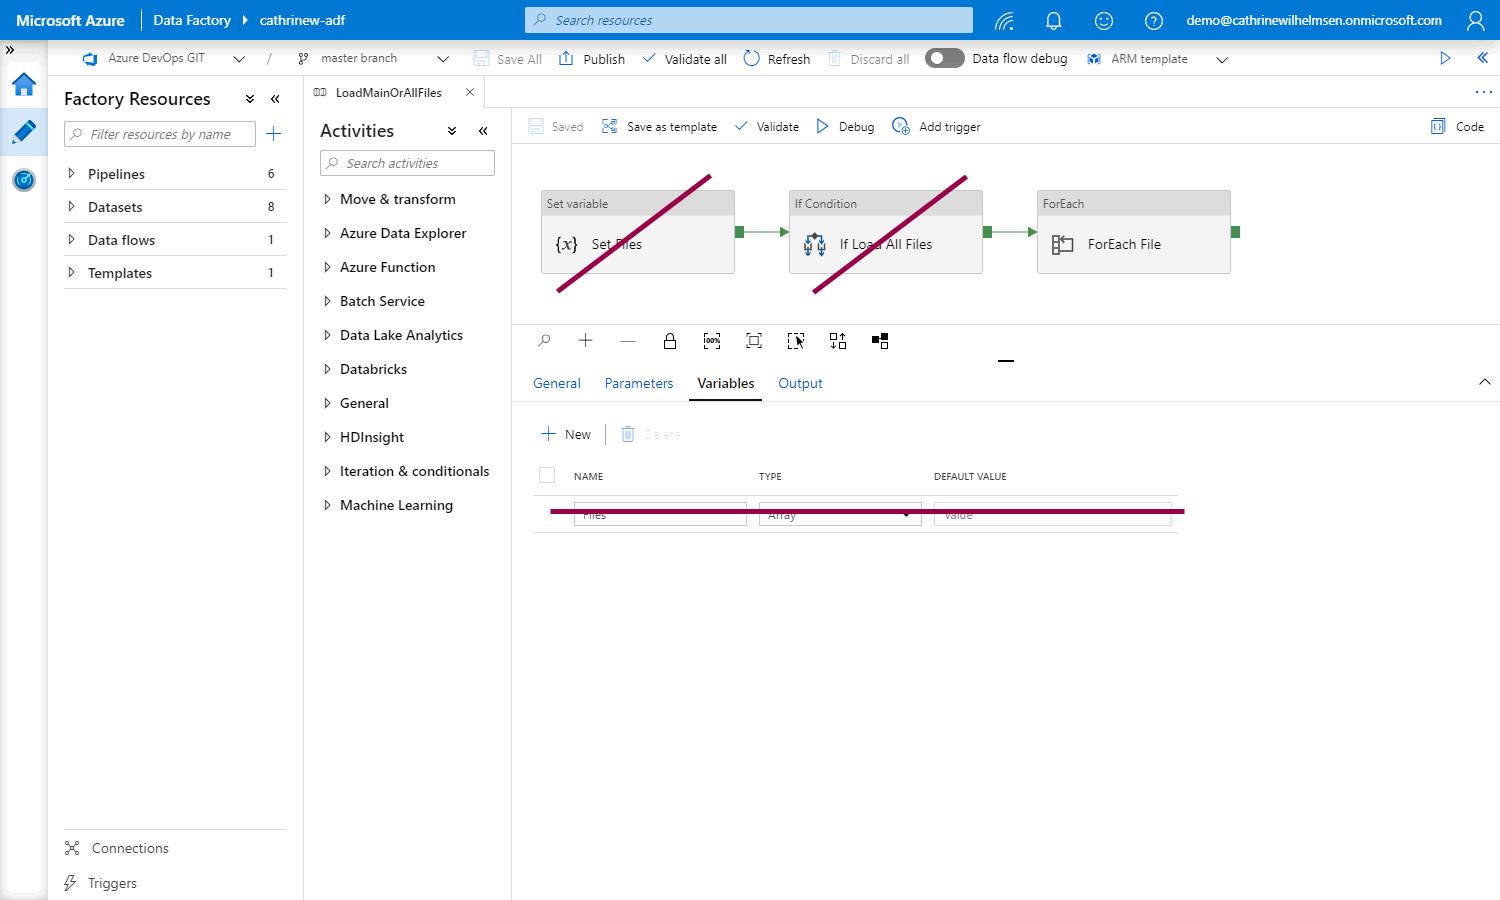
…with a lookup activity. To make this work, we need to replace the variable that we previously used to control the loop:
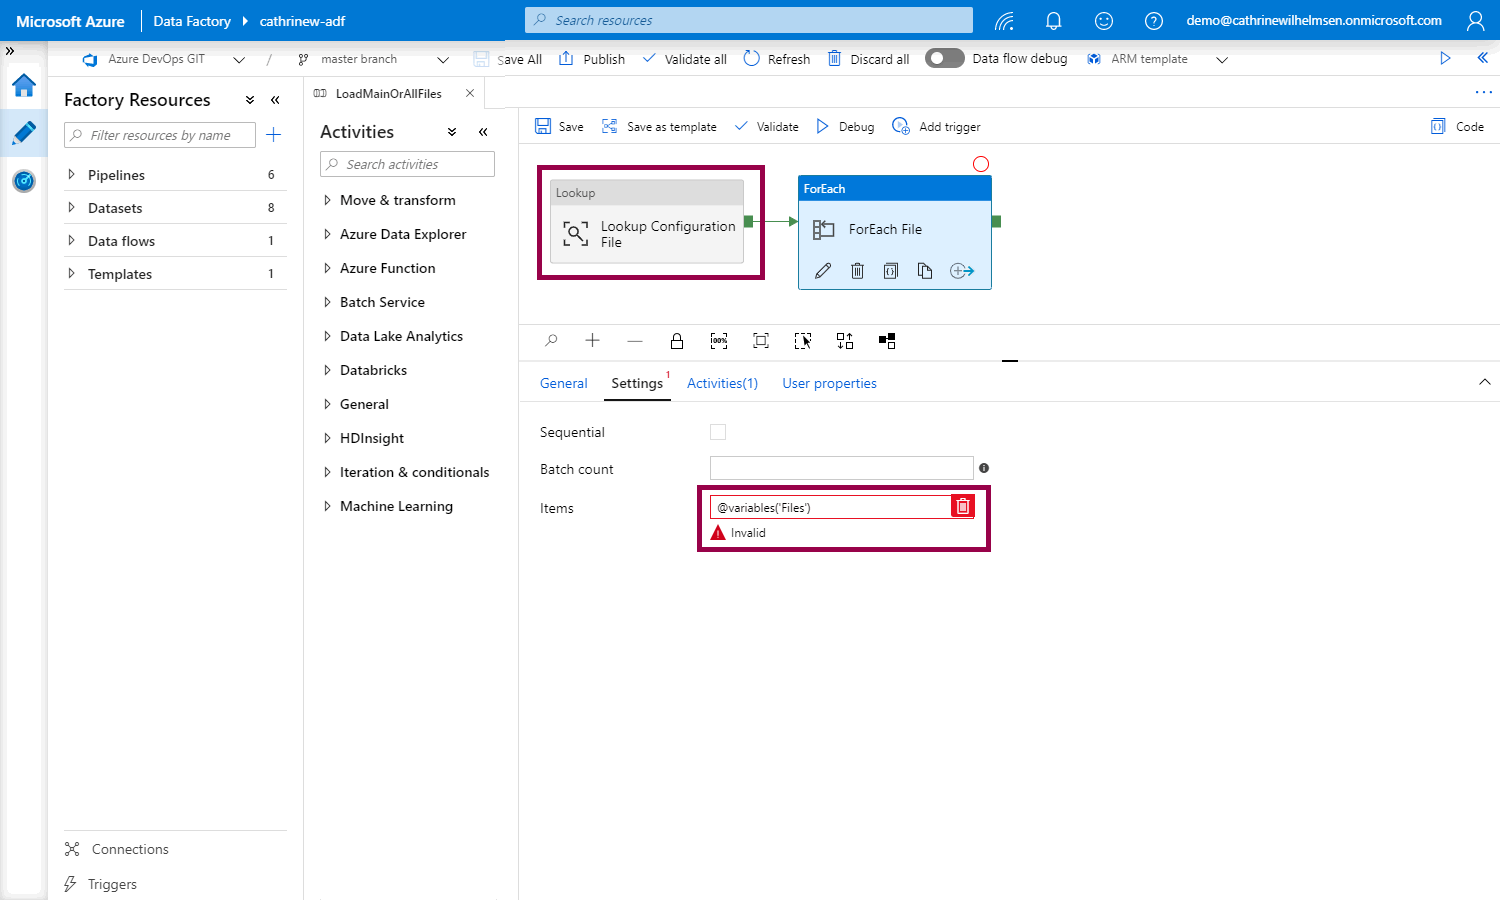
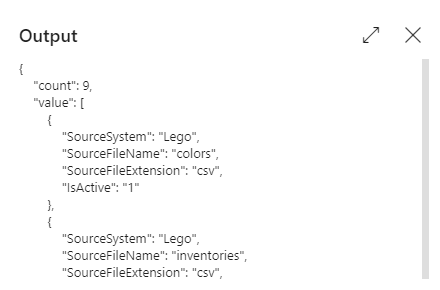
But with what? If we look at the JSON output for all rows…
{
    "count": 9,
    "value": [
        {
            "SourceSystem": "Lego",
            "SourceFileName": "colors",
            "SourceFileExtension": "csv",
            "IsActive": "1"
        },
        {
            "SourceSystem": "Lego",
            "SourceFileName": "inventories",
            "SourceFileExtension": "csv",
            "IsActive": "1"
        },
        ...
    ]
}
…we see that value is an array. Aha! 💡 In this case, we can use @activity(‘Lookup Configuration File’).output.value:
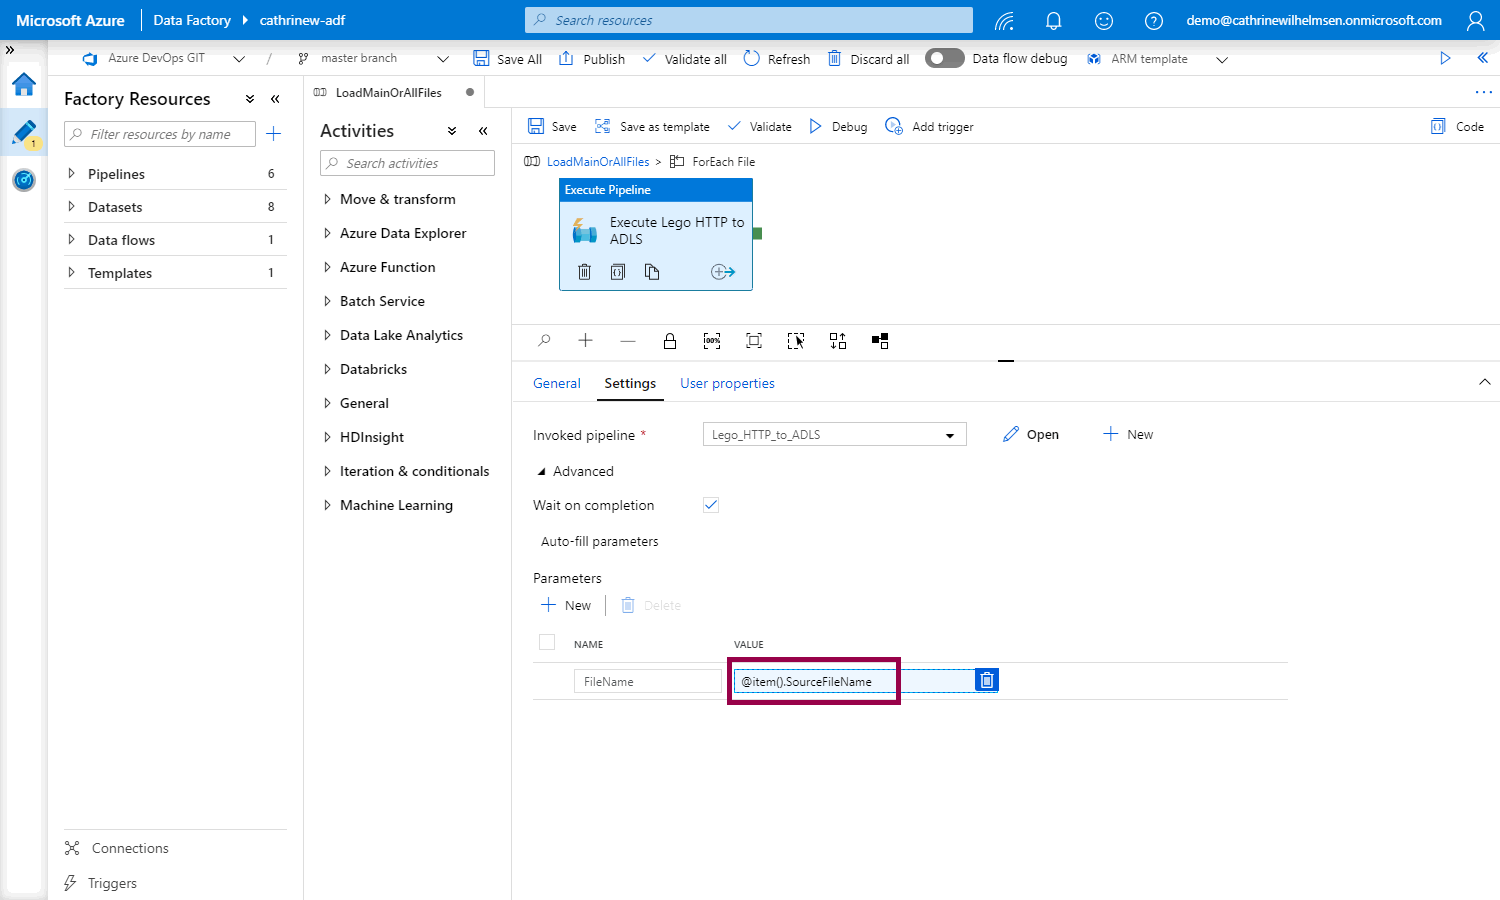
And then, inside the foreach loop, we need to change @item() to @item().SourceFileName, because we only want a to pass the file name as the parameter:
Filter Rows
Now, the very final piece of the puzzle is making sure that we filter the configuration values correctly. If we use a configuration table, we can apply the filter in the query. In that case, we’re done!
But if we use a configuration file, we need to add a filter activity:
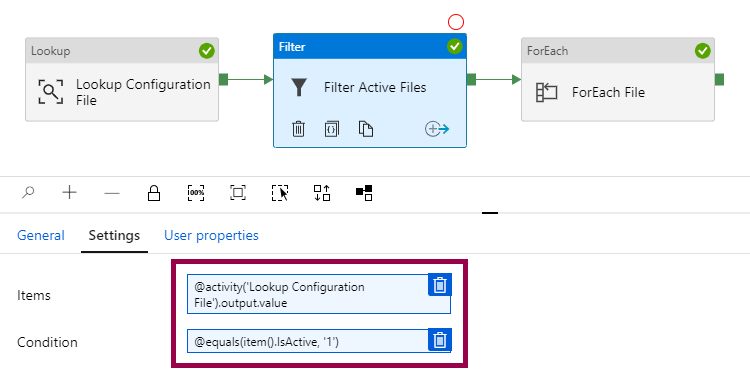
This time, we use @activity(‘Lookup Configuration File’).output.value as the filter items, and use the expression @equals(item().IsActive, ‘1’) as the filter condition.
Then, we change the foreach loop to use @activity(‘Filter Active Files’).output.value:
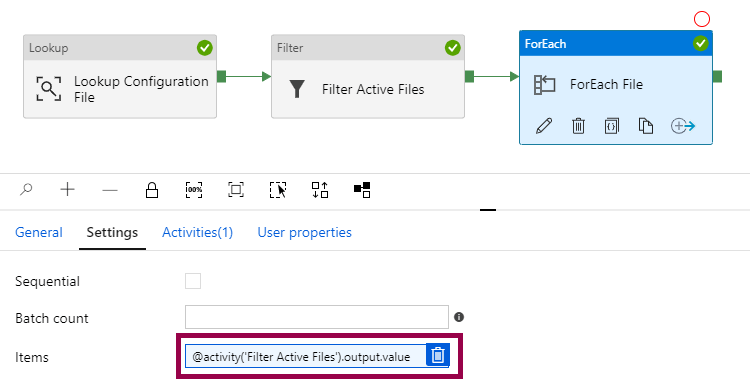
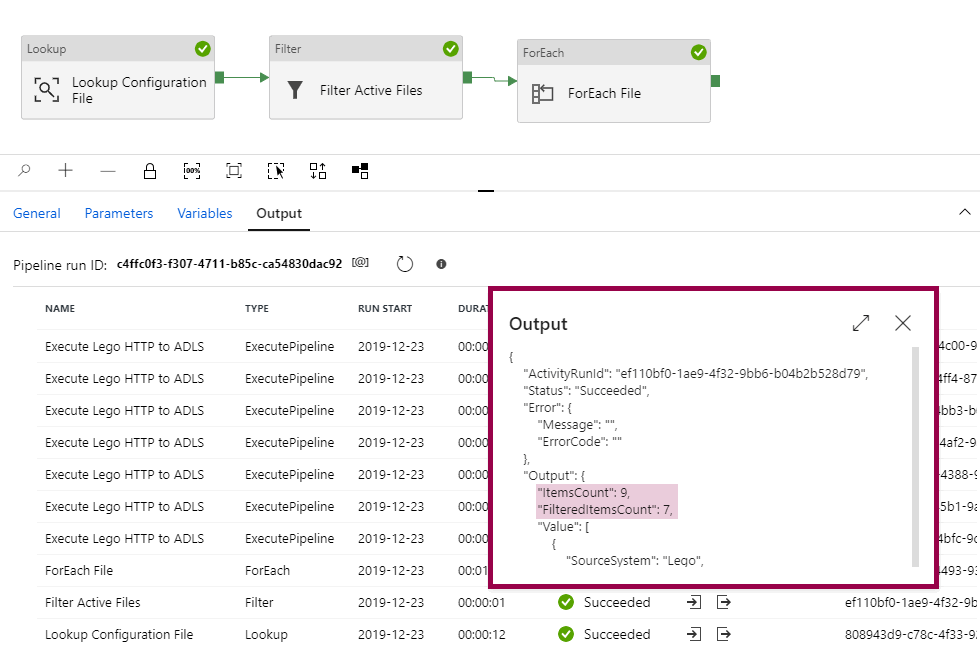
Tadaaa! 😁 The rows from the configuration file have been filtered from 9 to 7, and the foreach loop only ran seven times:
Summary
In this post, we added lookups to control our pipelines. We looked at the difference between getting first row only and all rows, and explained how to use the activity output to control later activities like foreach loops.
In the next post… We’re going to finish off the series by talking about pricing.
About the Author
 Cathrine Wilhelmsen is a Microsoft Data Platform MVP, international speaker, author, blogger, organizer, and chronic volunteer. She loves data and coding, as well as teaching and sharing knowledge - oh, and sci-fi, gaming, coffee and chocolate 🤓