Biml for OData Source and Connection Manager in SSIS

As of July 2018, there is no built-in Biml support for OData. To work with OData in Biml, you have to create a custom source and connection manager. This requires more Biml code than built-in functions like OleDbSource and may look a little overwhelming at first. But don’t worry! You don’t have to start from scratch.
In this blog post, we will first look at the properties of the OData Connection Manager and how to script it in Biml. Then, we will do the same for the OData Source. Finally, we will tie it all together and create a complete SSIS package that you can use a starting point for your own projects.
The Quick and Easy Solution
But before we dig into any code, let’s skip to the quick, easy, and timesaving solution:
- Install or upgrade to BimlExpress 2018
- Create an example SSIS package using an OData Source and Connection Manager
- Convert the SSIS package to Biml
- Done! 😎
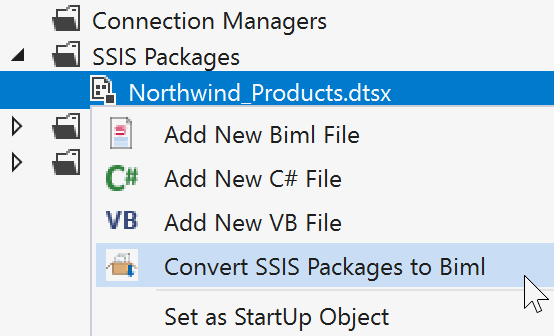
As promised: quick, easy, and timesaving! The new Convert SSIS Packages to Biml feature was released in BimlExpress 2018, and it really is a lifesaver. After converting to Biml, you can simply copy and paste the code into your projects.
However!
You may run into some bugs when you convert your SSIS packages to Biml. I ran into two issues while writing this blog post. The first was that I had to add UsesDispositions=“true” to the Source component. The second was that the data types in the Source component were prefixed with System. I have fixed both of these issues in my examples below. In addition to these issues, the converted Biml also contained some unnecessary code. Unnecessary code does not break anything, but it can make your code harder to read and maintain. Personally, I prefer my code to be as clean and simple as possible.
Ok, let’s dig into the actual Biml code!
OData Connection Manager
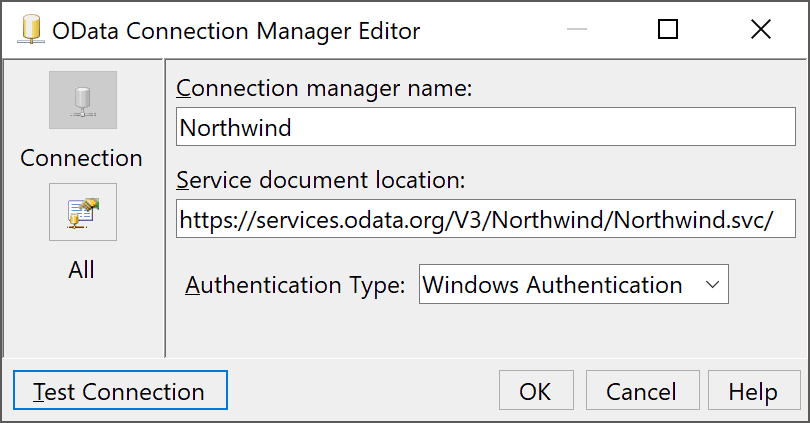
When we add an OData Connection Manager in SSIS, we have to specify a few properties: Connection Manager Name, Service Document Location, and Authentication Type. Depending on the authentication type, we may also have to specify a Username and Password. In this example, we connect to the Northwind service. Since this data is publicly available, we use Windows Authentication and do not have to specify a Username and Password:
OData Connection Manager in Biml
In Biml, the OData Connection Manager looks like this:
<CustomSsisConnection
Name="Northwind"
CreationName="ODATA"
ObjectData="
<ODataConnectionManager
  UserName=""
  Url="https://services.odata.org/V3/Northwind/Northwind.svc"
  ConnectionString="Service Document Url=https://services.odata.org/V3/Northwind/Northwind.svc;"
  MicrosoftOnlineServicesAuth="False"
  AuthType="WindowsAuthentication"
/>"
/>
Let’s go through this Biml step by step.
The CustomSsisConnection has three attributes:
- Name: The name we give the Connection Manager
- CreationName: The Connection Manager Type
- ObjectData: The XML code for the Connection Manager
The ObjectData attribute contains XML code. Since we are wrapping XML code in Biml code, which is also XML code, we have to escape the special characters:
- Less-than < is escaped to <
- Greater-than > is escaped to >
If we take the contents of the ObjectData attribute and replace the escaped characters with the actual characters, we get the following:
<ODataConnectionManager
UserName=""
Url="https://services.odata.org/V3/Northwind/Northwind.svc"
ConnectionString="Service Document Url=https://services.odata.org/V3/Northwind/Northwind.svc;"
MicrosoftOnlineServicesAuth="False"
AuthType="WindowsAuthentication"
/>
Now we can see that the Biml for the custom connection manager contains the entire ODataConnectionManager definition. But where does this definition come from? Why are we using it inside a Biml attribute?
(This is about to get very meta, but stay with me for just a little bit longer…)
If we open the .dtsx source code for a package with an OData connection manager, we will find the following code:

Hey, that DTS:CreationName=“ODATA” and DTS:ObjectData code looks familiar! They are the same attributes that we use in the Biml CustomSsisConnection code. But wait a minute. Are we taking parts of the .dtsx code and wrapping it in Biml code, so we can generate it back into .dtsx code…?
Yes! I told you it was getting very meta 😂
It may look overly complex from this simple example, but once we start scripting out tens, hundreds, or maybe even thousands of SSIS packages using just these few lines of Biml code, it makes a lot more sense.
OData Source
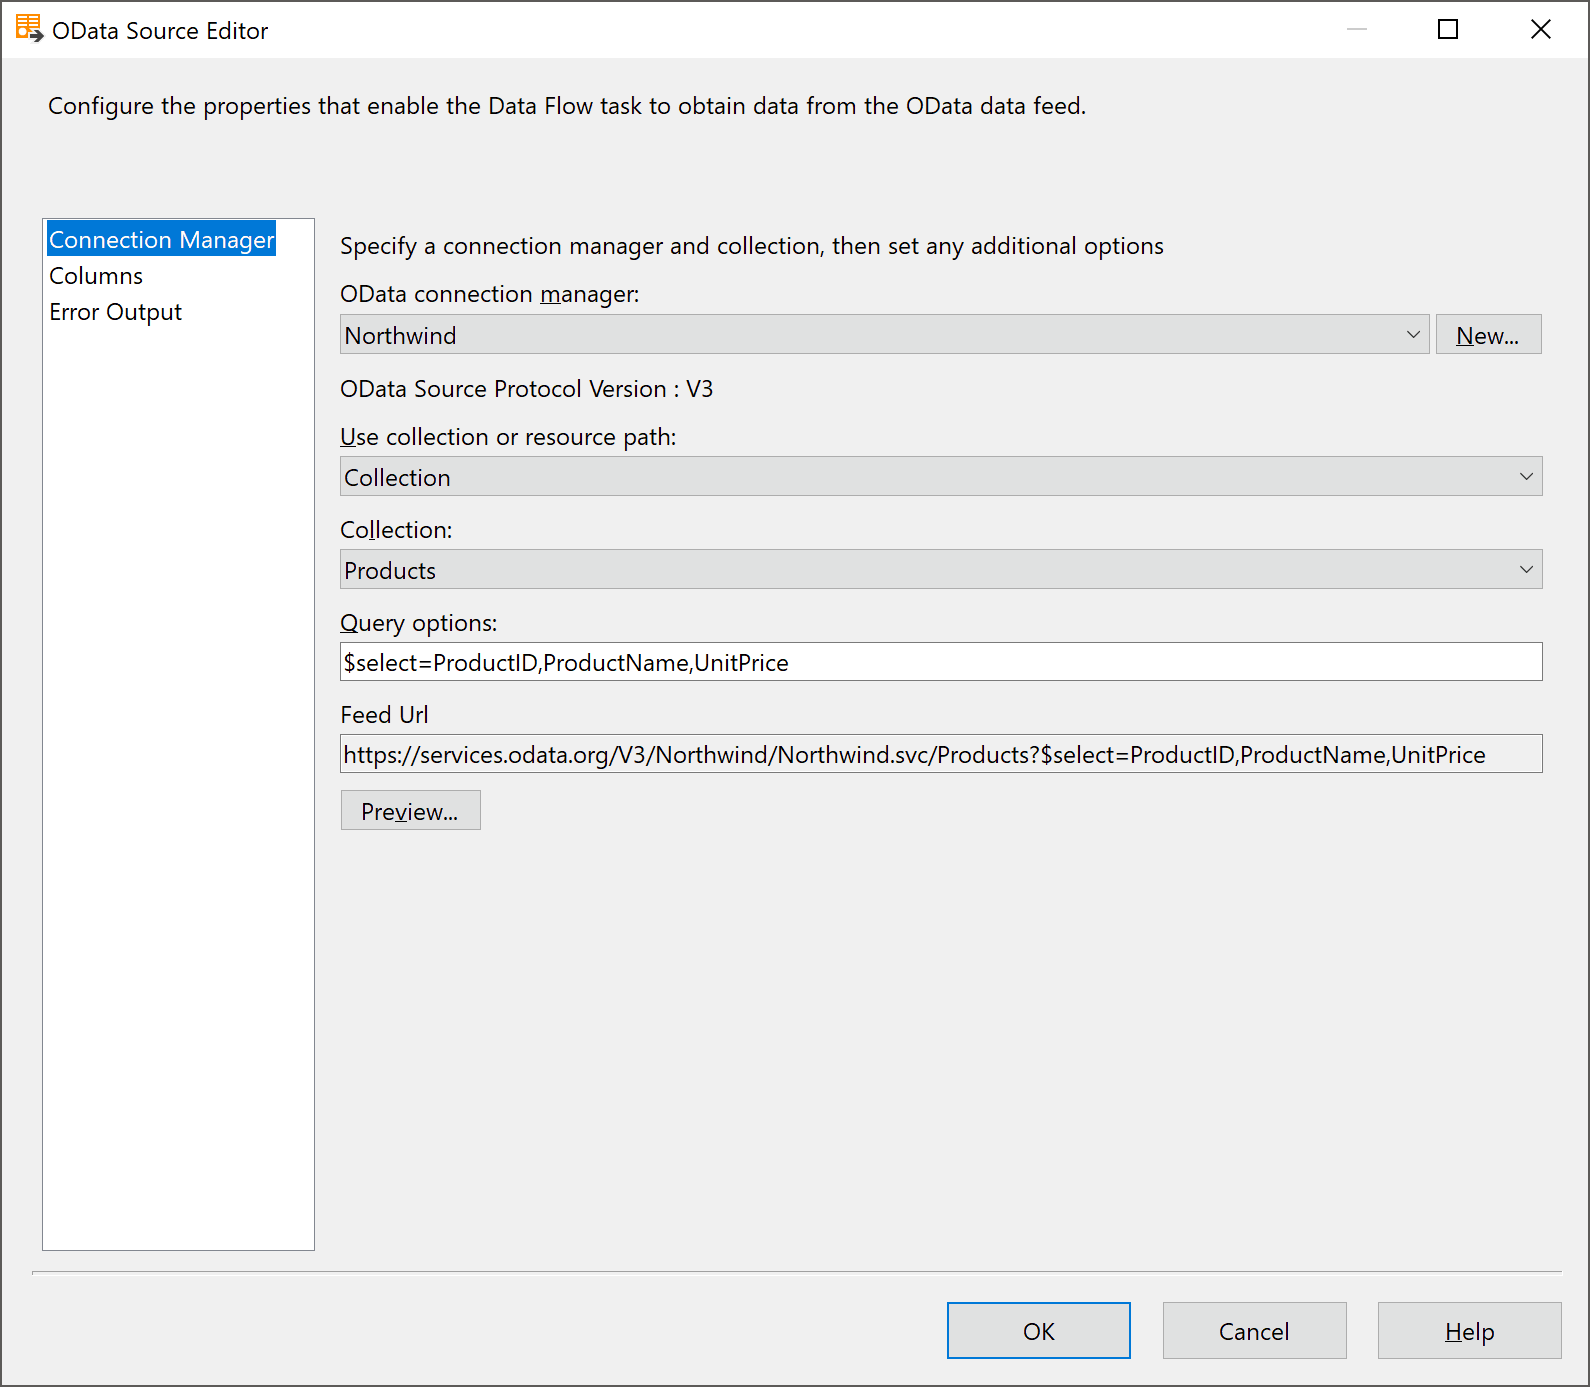
When we add an OData Source in SSIS, we have to specify a few properties: the OData Connection Manager, whether to use a Collection or Resource Path, the actual Collection or Resource Path, and the Query Options. The Feed URL is displayed based on the other properties:
OData Source in Biml
In Biml, the OData Source looks like this:
<CustomComponent Name="Source OData Northwind Products" ComponentTypeName="Microsoft.OData" UsesDispositions="true">
  <Connections>
    <Connection Name="Connection" ConnectionName="Northwind" />
  </Connections>
  <CustomProperties>
    <CustomProperty Name="CollectionName" DataType="String">Products</CustomProperty>
    <CustomProperty Name="DefaultStringLength" DataType="Int32">4000</CustomProperty>
    <CustomProperty Name="Query" DataType="String">$select=ProductID,ProductName,UnitPrice</CustomProperty>
    <CustomProperty Name="ResourcePath" DataType="String"></CustomProperty>
    <CustomProperty Name="UseResourcePath" DataType="Boolean">false</CustomProperty>
  </CustomProperties>
  <OutputPaths>
    <OutputPath Name="Output">
      <ExternalColumns>
        <ExternalColumn Name="ProductID" DataType="Int32" />
        <ExternalColumn Name="ProductName" DataType="String" Length="40" />
        <ExternalColumn Name="UnitPrice" DataType="Decimal" Precision="19" Scale="4" />
      </ExternalColumns>
      <OutputColumns>
        <OutputColumn Name="ProductID" DataType="Int32" ExternalMetadataColumnName="ProductID" />
        <OutputColumn Name="ProductName" DataType="String" Length="40" ExternalMetadataColumnName="ProductName" />
        <OutputColumn Name="UnitPrice" DataType="Decimal" Precision="19" Scale="4" ExternalMetadataColumnName="UnitPrice" />
      </OutputColumns>
    </OutputPath>
    <OutputPath Name="Error output" IsErrorOutput="true">
      <OutputColumns>
        <OutputColumn Name="ProductID" DataType="Int32" ErrorRowDisposition="FailComponent" TruncationRowDisposition="FailComponent" />
        <OutputColumn Name="ProductName" DataType="String" Length="40" ErrorRowDisposition="FailComponent" TruncationRowDisposition="FailComponent" />
        <OutputColumn Name="UnitPrice" DataType="Decimal" Precision="19" Scale="4" ErrorRowDisposition="FailComponent" TruncationRowDisposition="FailComponent" />
      </OutputColumns>
    </OutputPath>
  </OutputPaths>
</CustomComponent>
Let’s go through this code step by step.
CustomComponent has three attributes:
- Name: The name we give the component
- ComponentTypeName: The component type
- UsesDispositions: Whether or not the component has an error output
Connections uses the ConnectionName attribute to refer to the name of the CustomSsisConnection we created earlier.
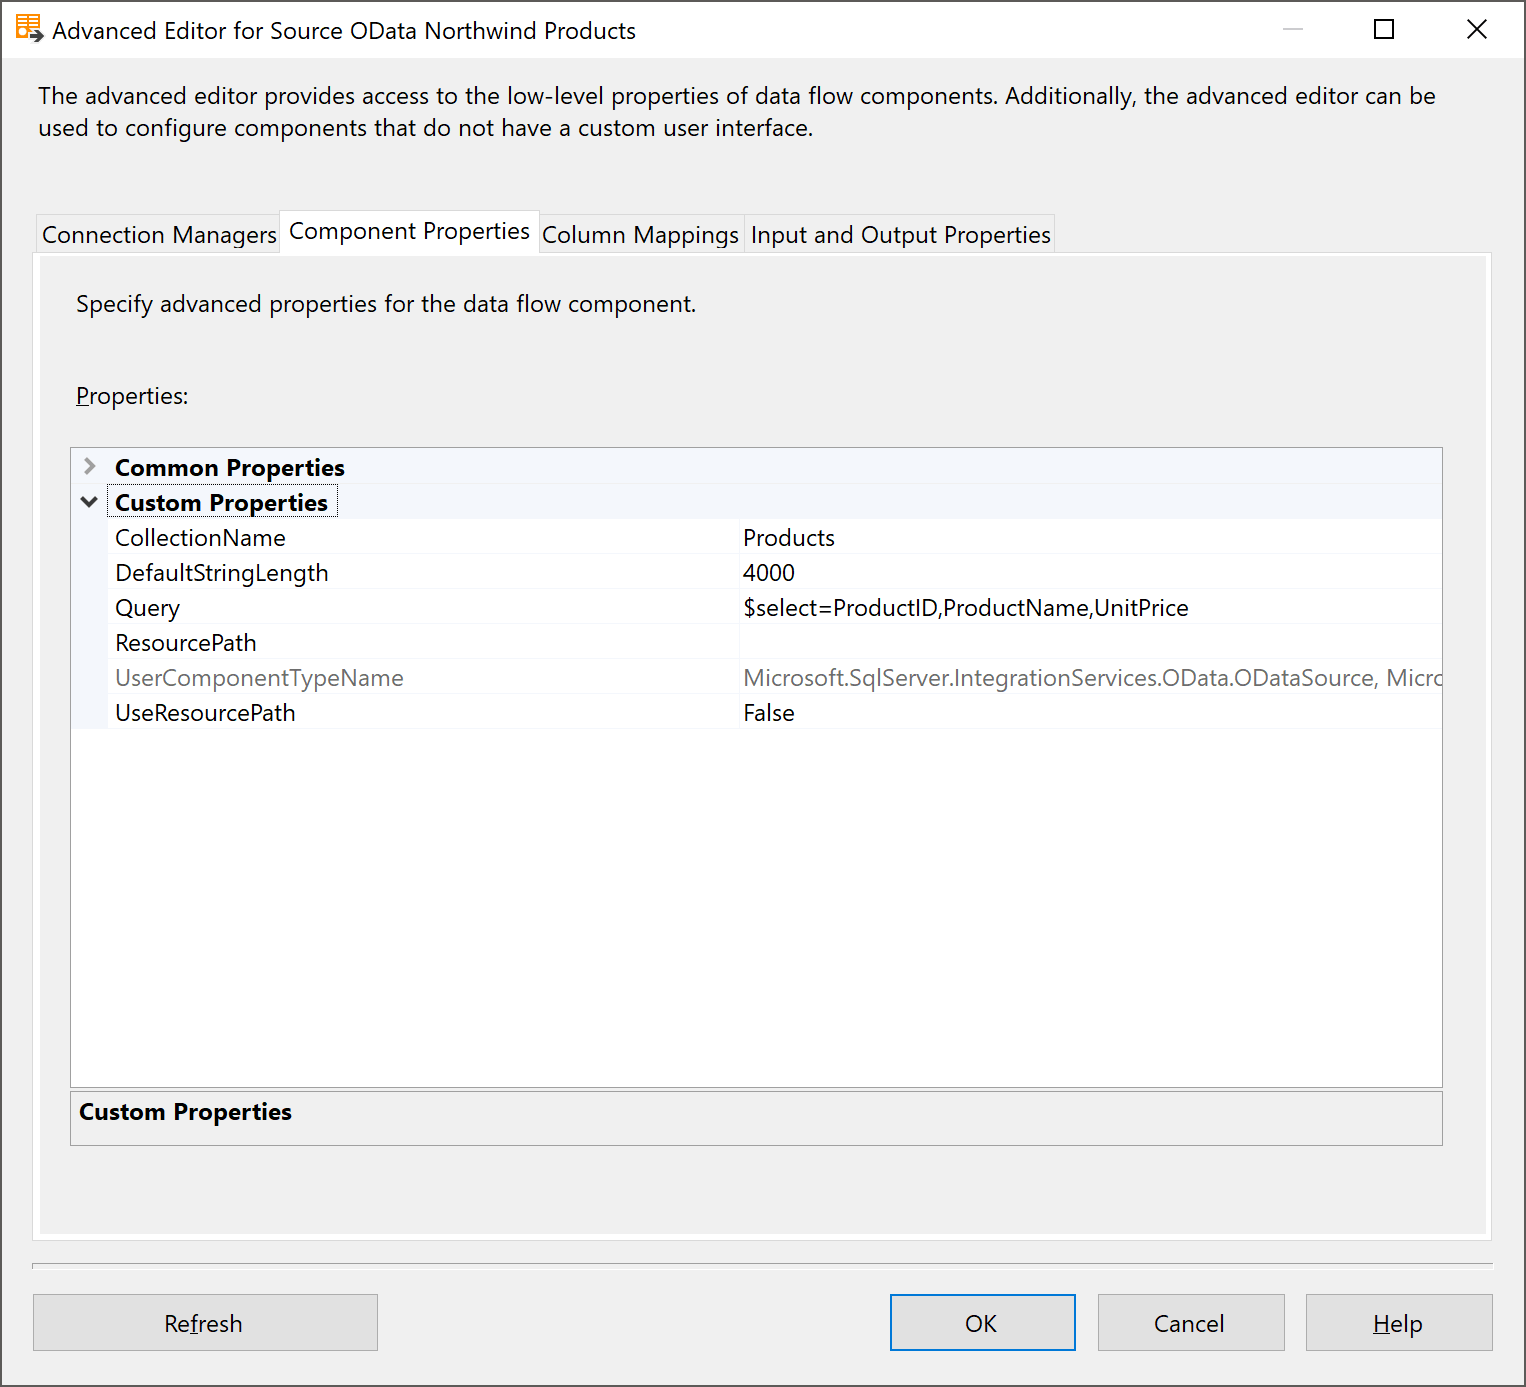
CustomProperties is a Biml code representation of the Component Properties tab in the SSIS Advanced Editor:
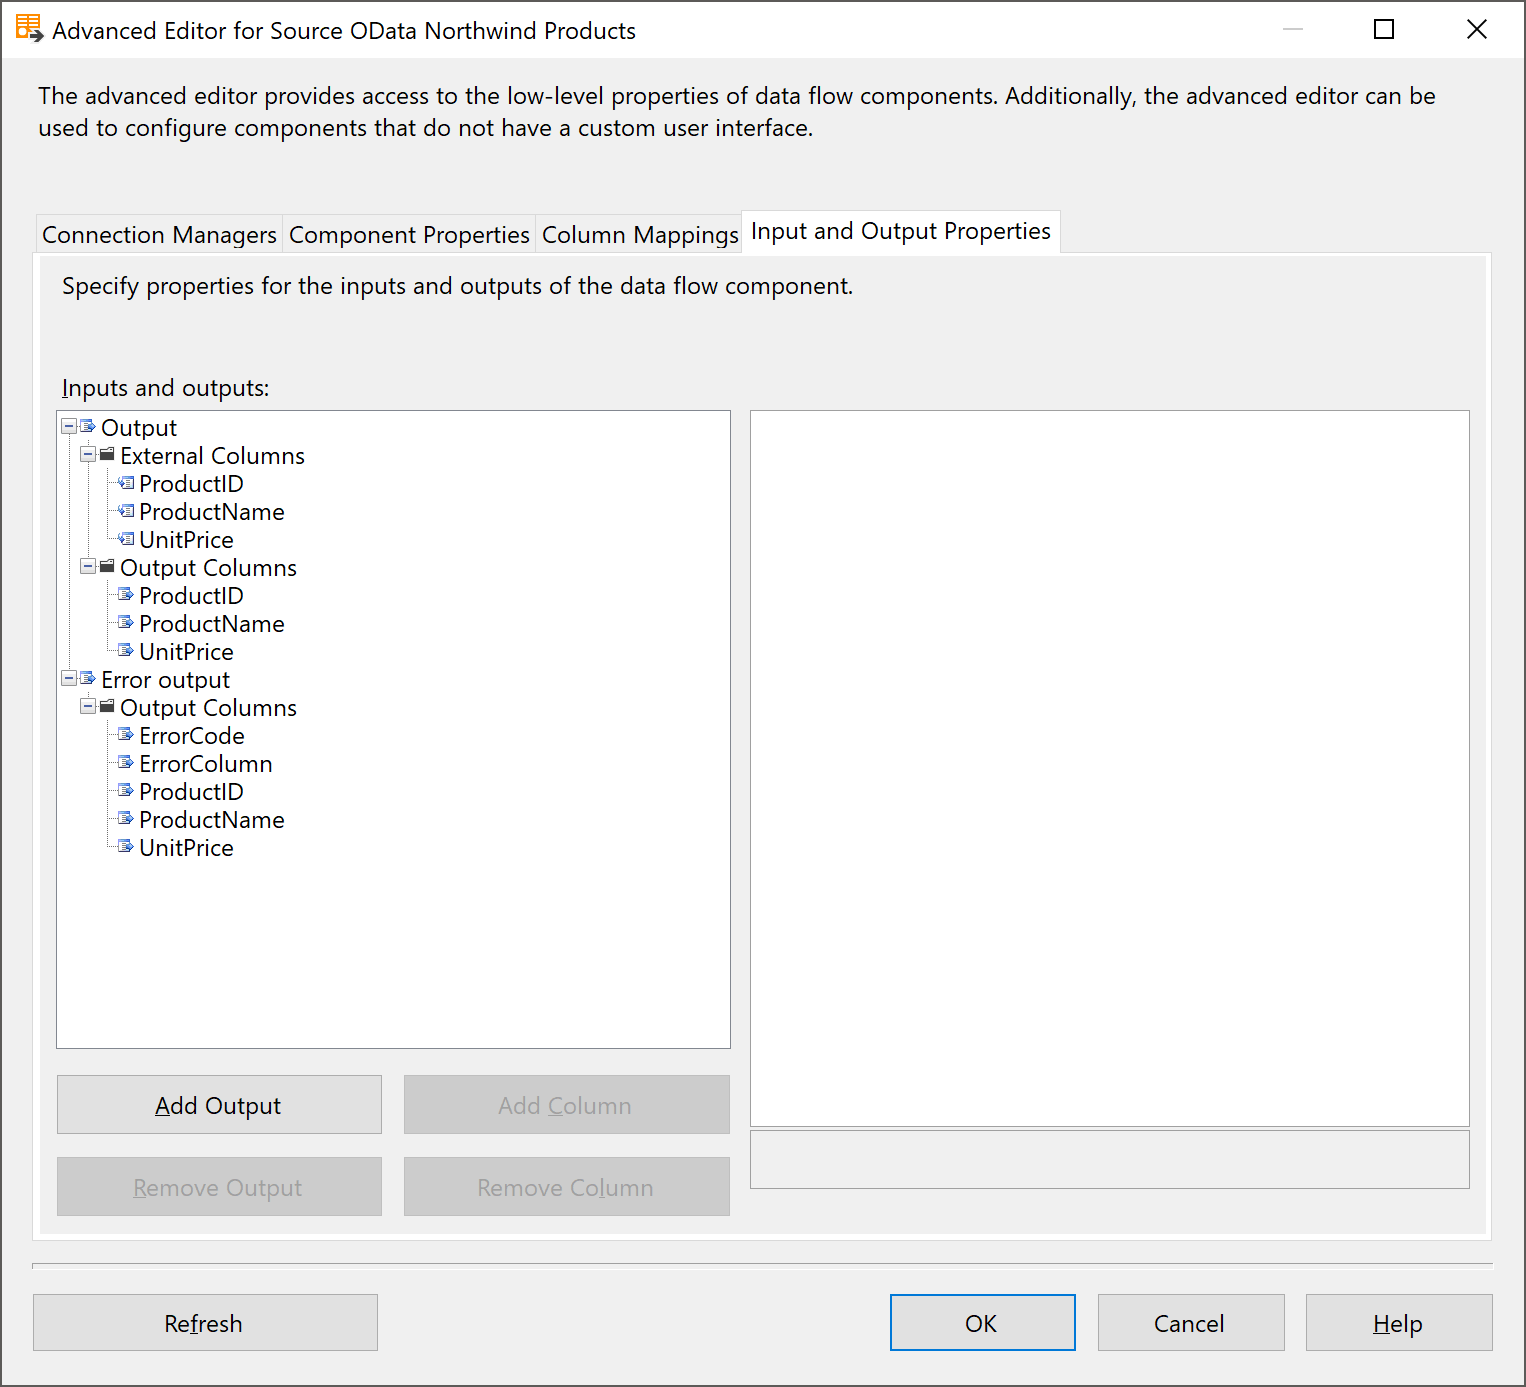
OutputPaths is a Biml code representation of the Input and Output Properties tab in the SSIS Advanced Editor:
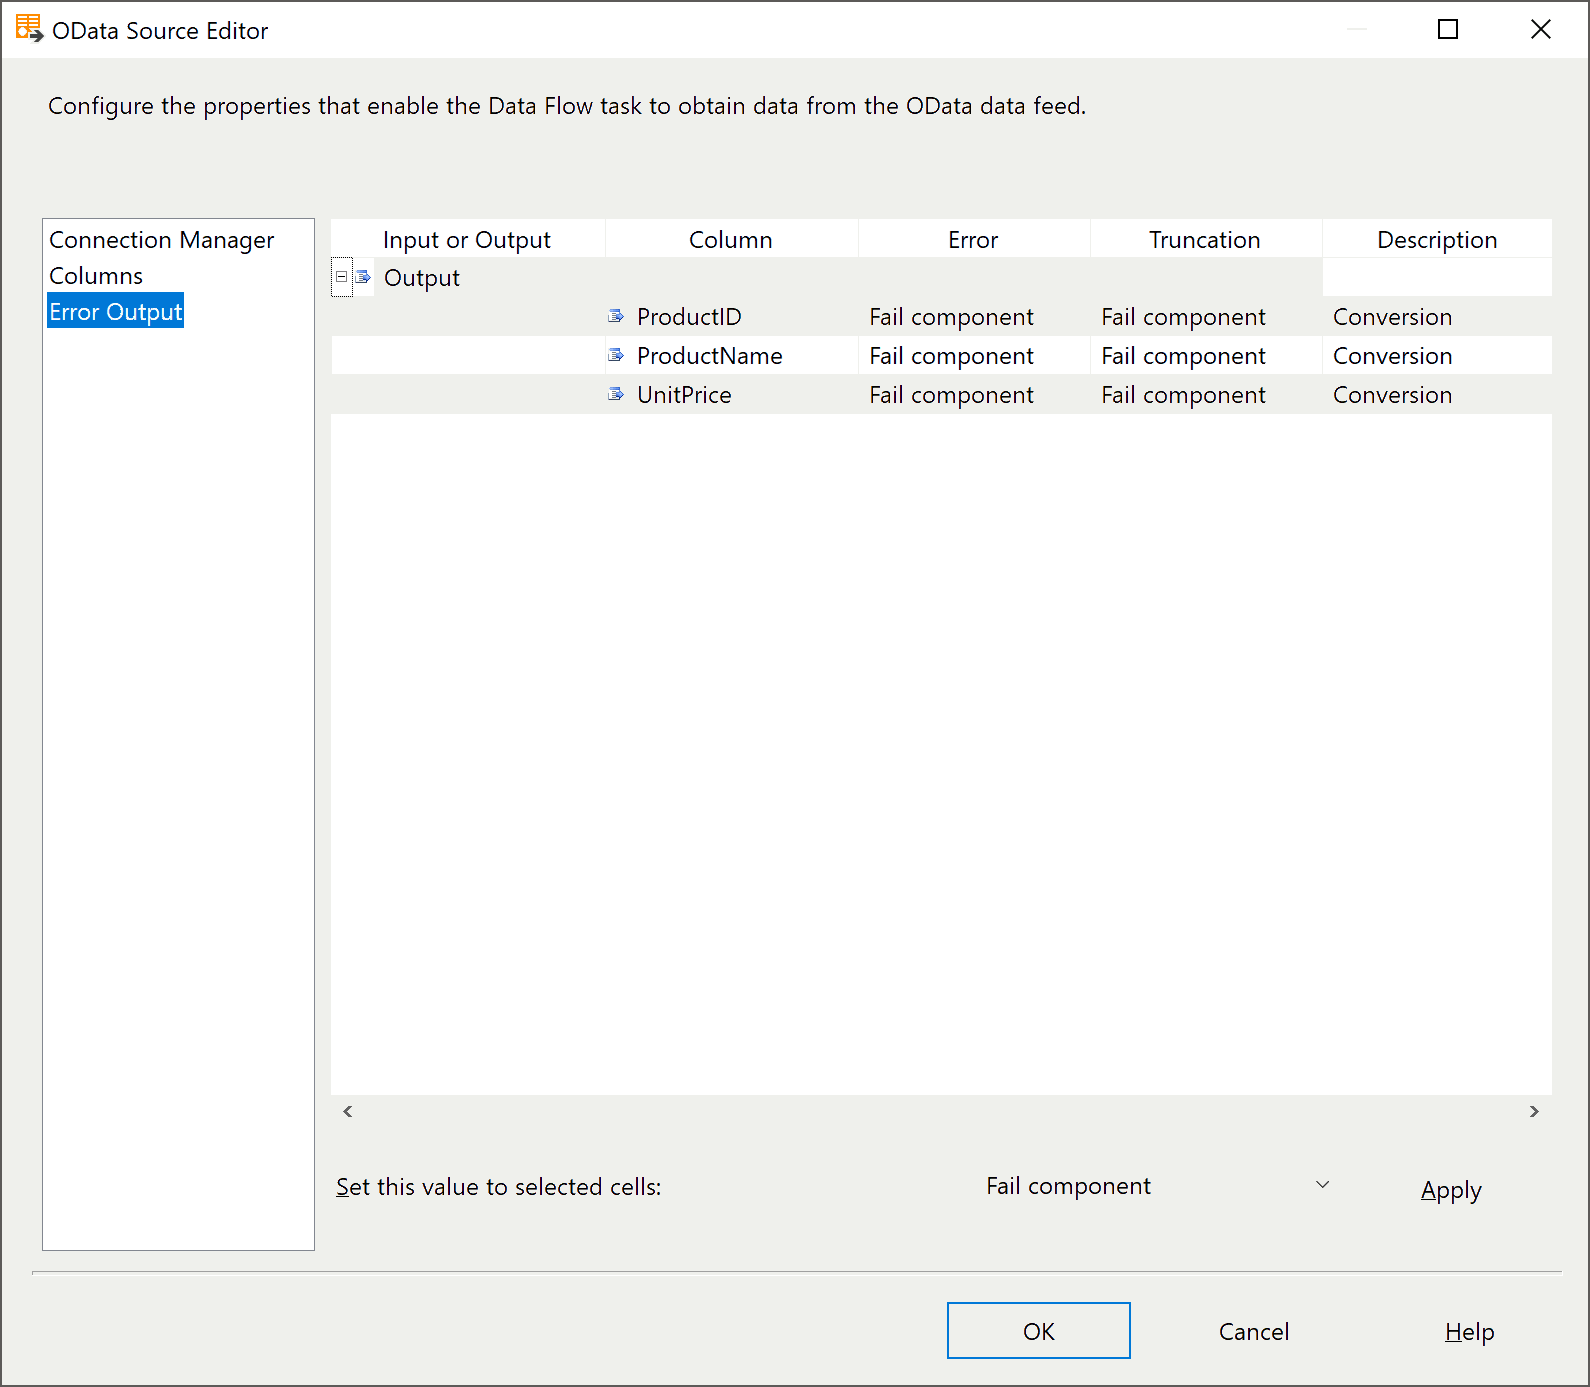
The Error output also specifies the Error and Truncation options that we can find in the regular Error Output options:
Load from OData Source to OLE DB Destination
Let’s tie it all together! In this example, we want to load data from the Product collection in the Northwind service. We only want to get three columns, so we pass in the query $select=ProductID,ProductName,UnitPrice (line 29).
The code below shows how to create an SSIS package that uses the Truncate and Load pattern. First, it truncates the destination table. Then, it loads data from the source to the destination table.
<Biml xmlns="http://schemas.varigence.com/biml.xsd">

  <Connections>
    <Connection Name="Staging" ConnectionString="Data Source=.;Initial Catalog=Staging;Provider=SQLNCLI11;Integrated Security=SSPI;" />
    <CustomSsisConnection Name="Northwind" CreationName="ODATA" ObjectData="<ODataConnectionManager Url="https://services.odata.org/V3/Northwind/Northwind.svc" ConnectionString="Service Document Url=https://services.odata.org/V3/Northwind/Northwind.svc;" AuthType="WindowsAuthentication" MicrosoftOnlineServicesAuth="False" UserName="" />" />
  </Connections>

  <Packages>

    <Package Name="Northwind_Products" ConstraintMode="Linear">
      <Tasks>

        <ExecuteSQL Name="Truncate Northwind Products" ConnectionName="Staging">
        <DirectInput>TRUNCATE TABLE [dbo].[Northwind_Products]</DirectInput>
        </ExecuteSQL>

        <Dataflow Name="Load Northwind Products">
          <Transformations>

            <CustomComponent Name="Source OData Northwind Products" ComponentTypeName="Microsoft.OData" UsesDispositions="true">
              <Connections>
                <Connection Name="Connection" ConnectionName="Northwind" />
              </Connections>
              <CustomProperties>
                <CustomProperty Name="CollectionName" DataType="String">Products</CustomProperty>
                <CustomProperty Name="DefaultStringLength" DataType="Int32">4000</CustomProperty>
                <CustomProperty Name="Query" DataType="String">$select=ProductID,ProductName,UnitPrice</CustomProperty>
                <CustomProperty Name="ResourcePath" DataType="String"></CustomProperty>
                <CustomProperty Name="UseResourcePath" DataType="Boolean">false</CustomProperty>
              </CustomProperties>
              <OutputPaths>
                <OutputPath Name="Output">
                  <OutputColumns>
                    <OutputColumn Name="ProductID" DataType="Int32" ExternalMetadataColumnName="ProductID" />
                    <OutputColumn Name="ProductName" DataType="String" Length="40" ExternalMetadataColumnName="ProductName" />
                    <OutputColumn Name="UnitPrice" DataType="Decimal" Precision="19" Scale="4" ExternalMetadataColumnName="UnitPrice" />
                  </OutputColumns>
                  <ExternalColumns>
                    <ExternalColumn Name="ProductID" DataType="Int32" />
                    <ExternalColumn Name="ProductName" DataType="String" Length="40" />
                    <ExternalColumn Name="UnitPrice" DataType="Decimal" Precision="19" Scale="4" />
                  </ExternalColumns>
                </OutputPath>
                <OutputPath Name="Error output" IsErrorOutput="true">
                  <OutputColumns>
                    <OutputColumn Name="ProductID" DataType="Int32" ErrorRowDisposition="FailComponent" TruncationRowDisposition="FailComponent" />
                    <OutputColumn Name="ProductName" DataType="String" Length="40" ErrorRowDisposition="FailComponent" TruncationRowDisposition="FailComponent" />
                    <OutputColumn Name="UnitPrice" DataType="Decimal" Precision="19" Scale="4" ErrorRowDisposition="FailComponent" TruncationRowDisposition="FailComponent" />
                  </OutputColumns>
                </OutputPath>
              </OutputPaths>
            </CustomComponent>

            <OleDbDestination Name="Destination Staging Northwind_Products" ConnectionName="Staging">
              <InputPath OutputPathName="Source OData Northwind Products.Output" />
              <ExternalTableOutput Table="[dbo].[Northwind_Products]" />
            </OleDbDestination>

          </Transformations>
        </Dataflow>

      </Tasks>
    </Package>

  </Packages>

</Biml>
Summary
In this blog post, we looked at the details of how to script the SSIS OData Source and Connection Manager in Biml. A quick, easy, and timesaving solution is to use the Convert SSIS Packages to Biml feature to generate all the Biml for you. But please be aware that you may run into some bugs, and that you may want to clean up and simplify the generated Biml code.
About the Author
 Cathrine Wilhelmsen is a Microsoft Data Platform MVP, international speaker, author, blogger, organizer, and chronic volunteer. She loves data and coding, as well as teaching and sharing knowledge - oh, and sci-fi, gaming, coffee and chocolate 🤓